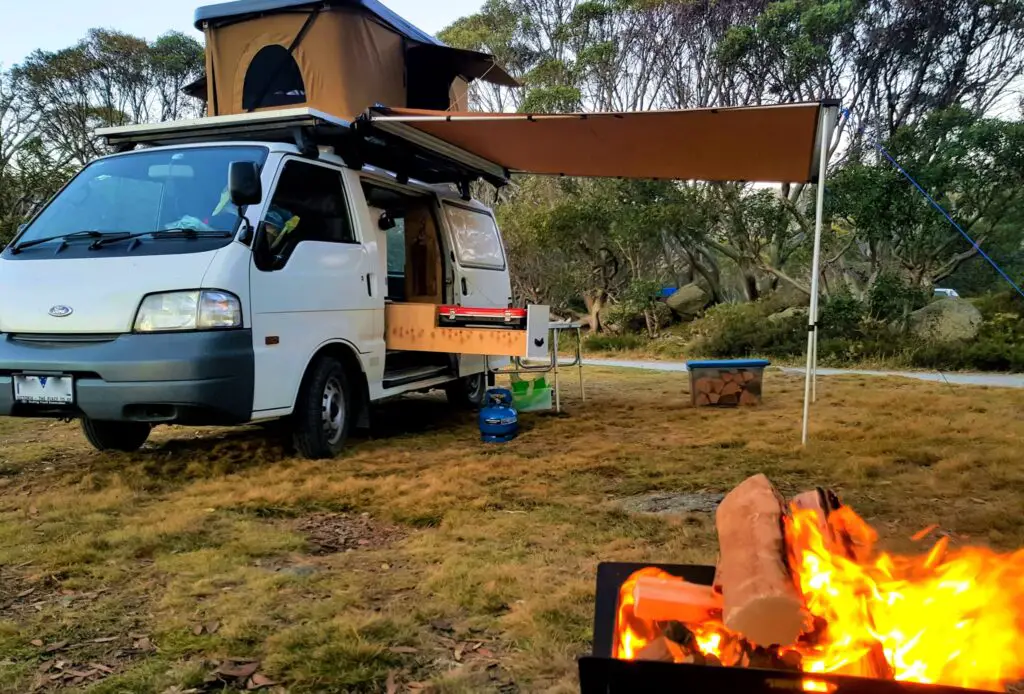
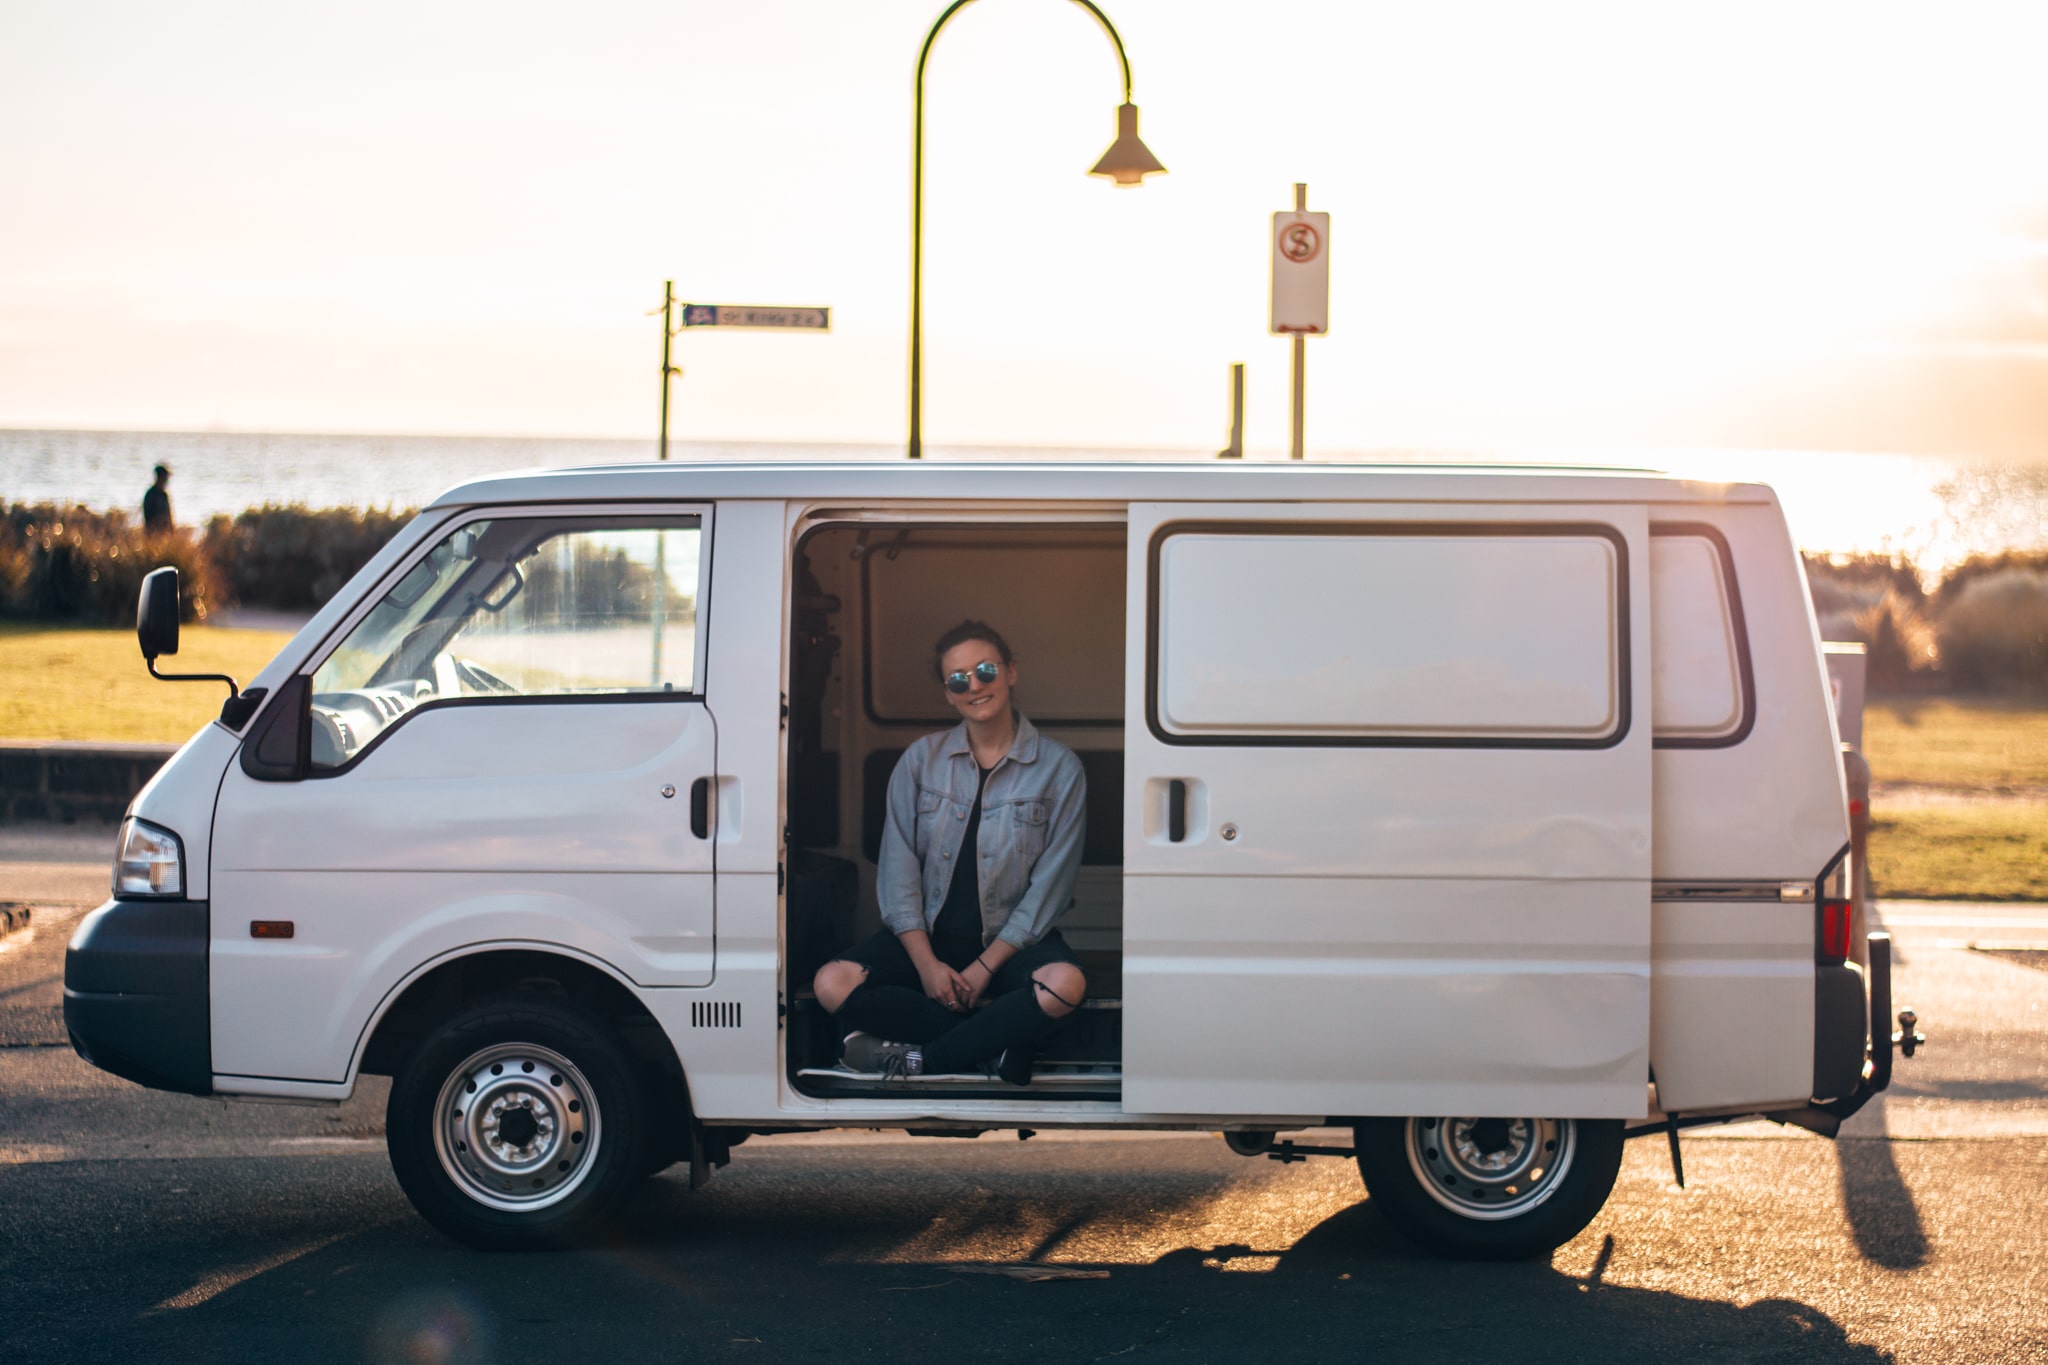
Let me introduce you to Maeve – my 2004 Ford Econovan, which has been home converted into a camper van, (an acronym of ‘Mini Adventure EconoVan Explorer’) for road tripping Australia!
I’ve actually been meaning to share a blog post on the final fit out of my Econovan camper for nearly a year now – but you know, life!
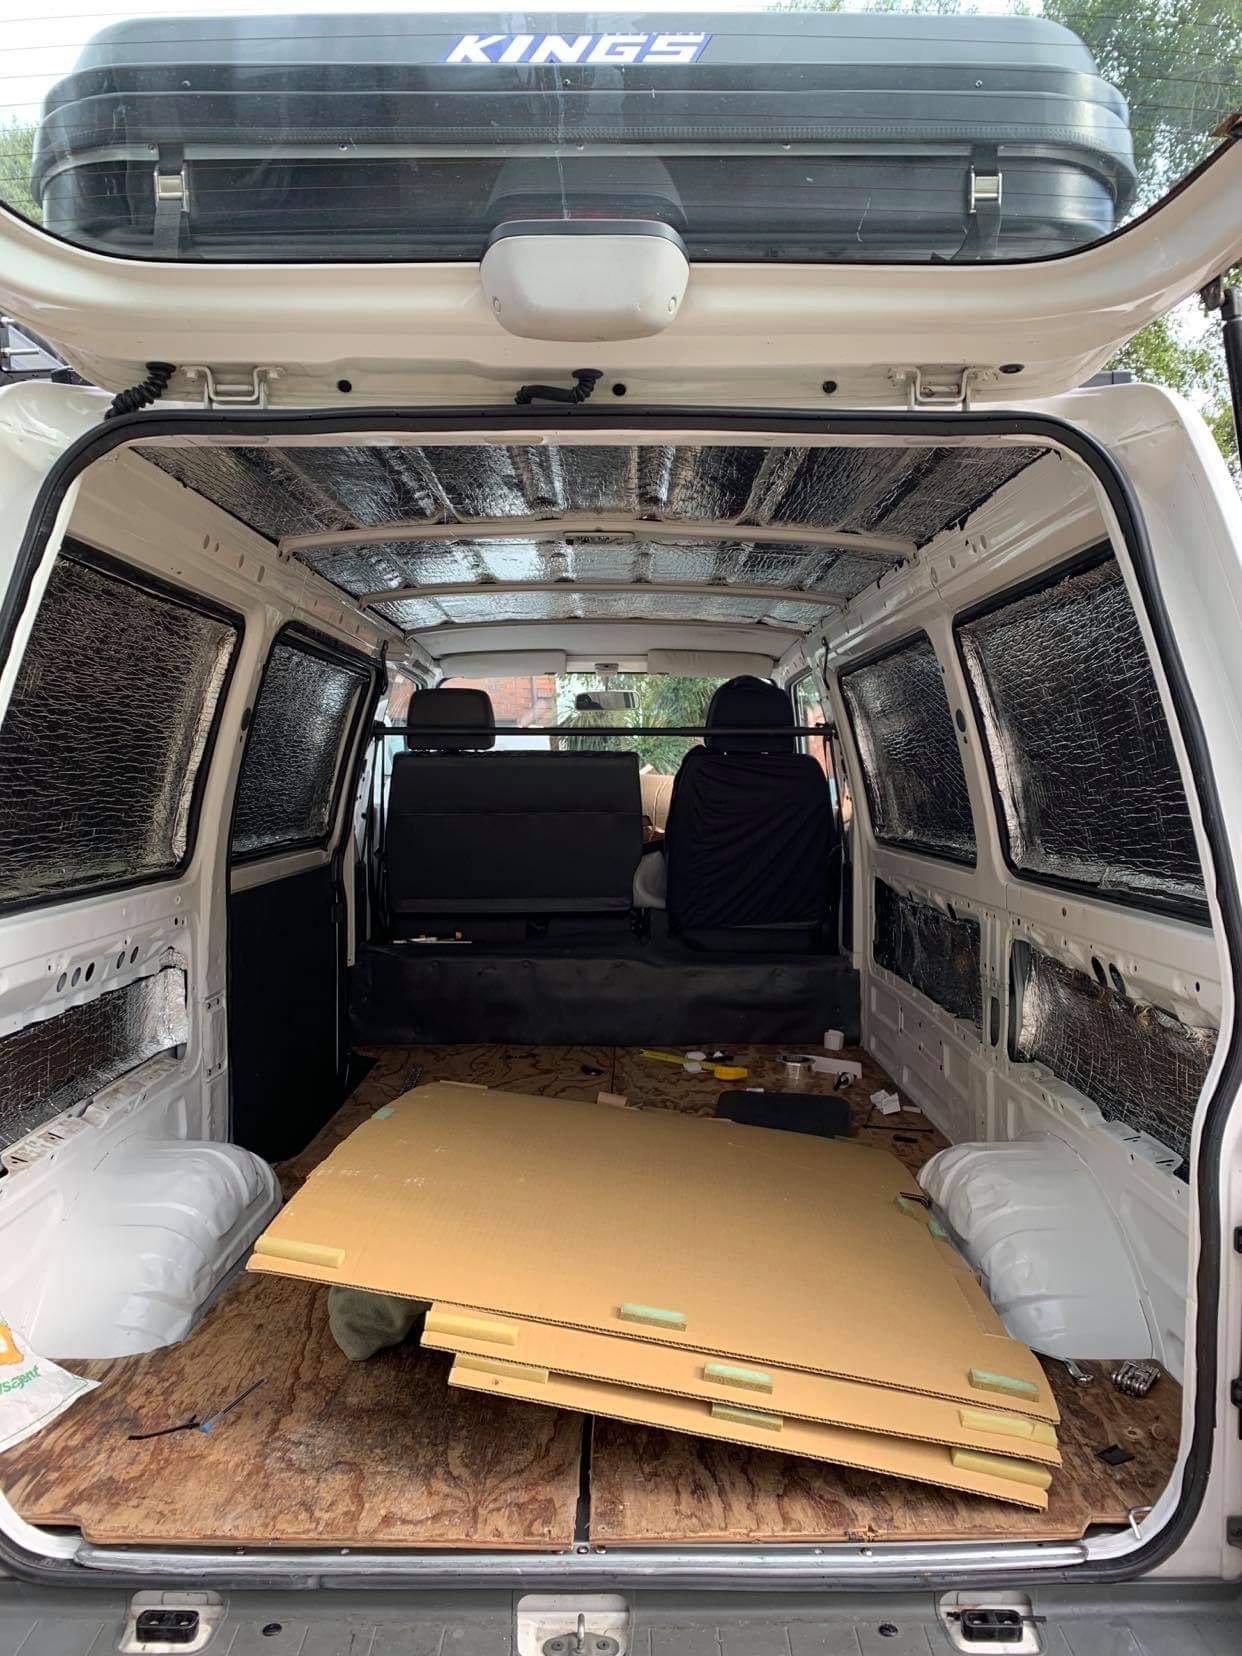
After buying Maeve in October 2020 in the midst of a second lockdown in Melbourne, my partner and I spent 4 weeks of intense evenings and weekends converting it from an empty shell into a modest adventure van.
Since the fit out, I’ve taken Maeve on countless trips across Australia now (in fact, I go away practically every weekend). Road trips include the stunning Otway National Park and also a 10 day trip to South Australia (including stops at historic Burra and a weekend in the Clare Valley). Having a van has been just one of many ways to inject more adventure into life when working full-time.
There have been a few minor modifications since the initial fit out, such as the addition of a gas shower and a second battery for the solar panel, but all in all, I’ve been pretty happy with the interior design.
I managed to do it fairly cheap and cheerfully for a total of around $5,000 AUD. That includes everything from the tools and insulation, to the solar panel and electrical goods (though of course that’s excluding the cost of the vehicle).
Don’t get me wrong – this van was never meant to be an ‘Instaworthy’ luxury van. The plan was always to do it quickly and cheaply with the prospect of making improvements in the future if required. It’s a little rough around the edges, but it’s totally functional and no matter where we go, people always stop and admire it. So it can’t be that bad I guess!
In this post I thought I’d share a tour, or more so a walk-through of the complete interior fit out of my Ford Econovan camper van, (also known as a Mazda Bongo or Mazda E-series).
Being such a small van it was paramount to get the layout just right but it wasn’t easy to research ideas that weren’t for much larger vehicles such as Sprinters or Transits. So I thought I’d add the result of my own small van fit out through my little corner of the internet.
I also wanted to share how we built it step-by-step and my tips and advice with the advantage of hindsight for converting a small van. Because there are certainly minor things I would change if I started all over again.
So if you are looking into converting a Ford Econovan, or a similar small van like a Mitsubishi Express, take a look at what I did and perhaps it will spark some ideas!
*This post may contain affiliate links meaning should you purchase a product via this link, I’ll earn a small commission at no extra cost to you. See my privacy and disclosure policy for more.*
PIN FOR LATER:
Planning The Layout For The Ford Econovan Camper Van
Planning the layout of the Econovan was probably the most laborious part of the whole build. I kept changing my mind about what I wanted to do and if you’re doing up your own van, I’m sure you will go through exactly the same process.
Once I purchased the van and had it measured up, I mapped out a few different designs on my dining room floor with masking tape and string. It was incredibly useful to visualise the space and work out rough measurements for the different interior components.
When designing a small camper van, it’s important to think about how you are going to use it. For example, are you simply a weekend warrior? Do you want to travel in it more long-term? Similarly, what are your hobbies and the activities you’ll be doing from and in the van? All these initial considerations about what you want from the van will make designing it all the more tailored to your needs.
Personally, I love hiking and I also wanted to make it as liveable as possible as I was considering doing long-term trips, or even working from my laptop whilst I travelled. Therefore that planned usage had a big impact on the practical liveability of my design including a desk and lots of storage for hiking gear.
The final layout came quite late in the process. Here is everything we decided on:
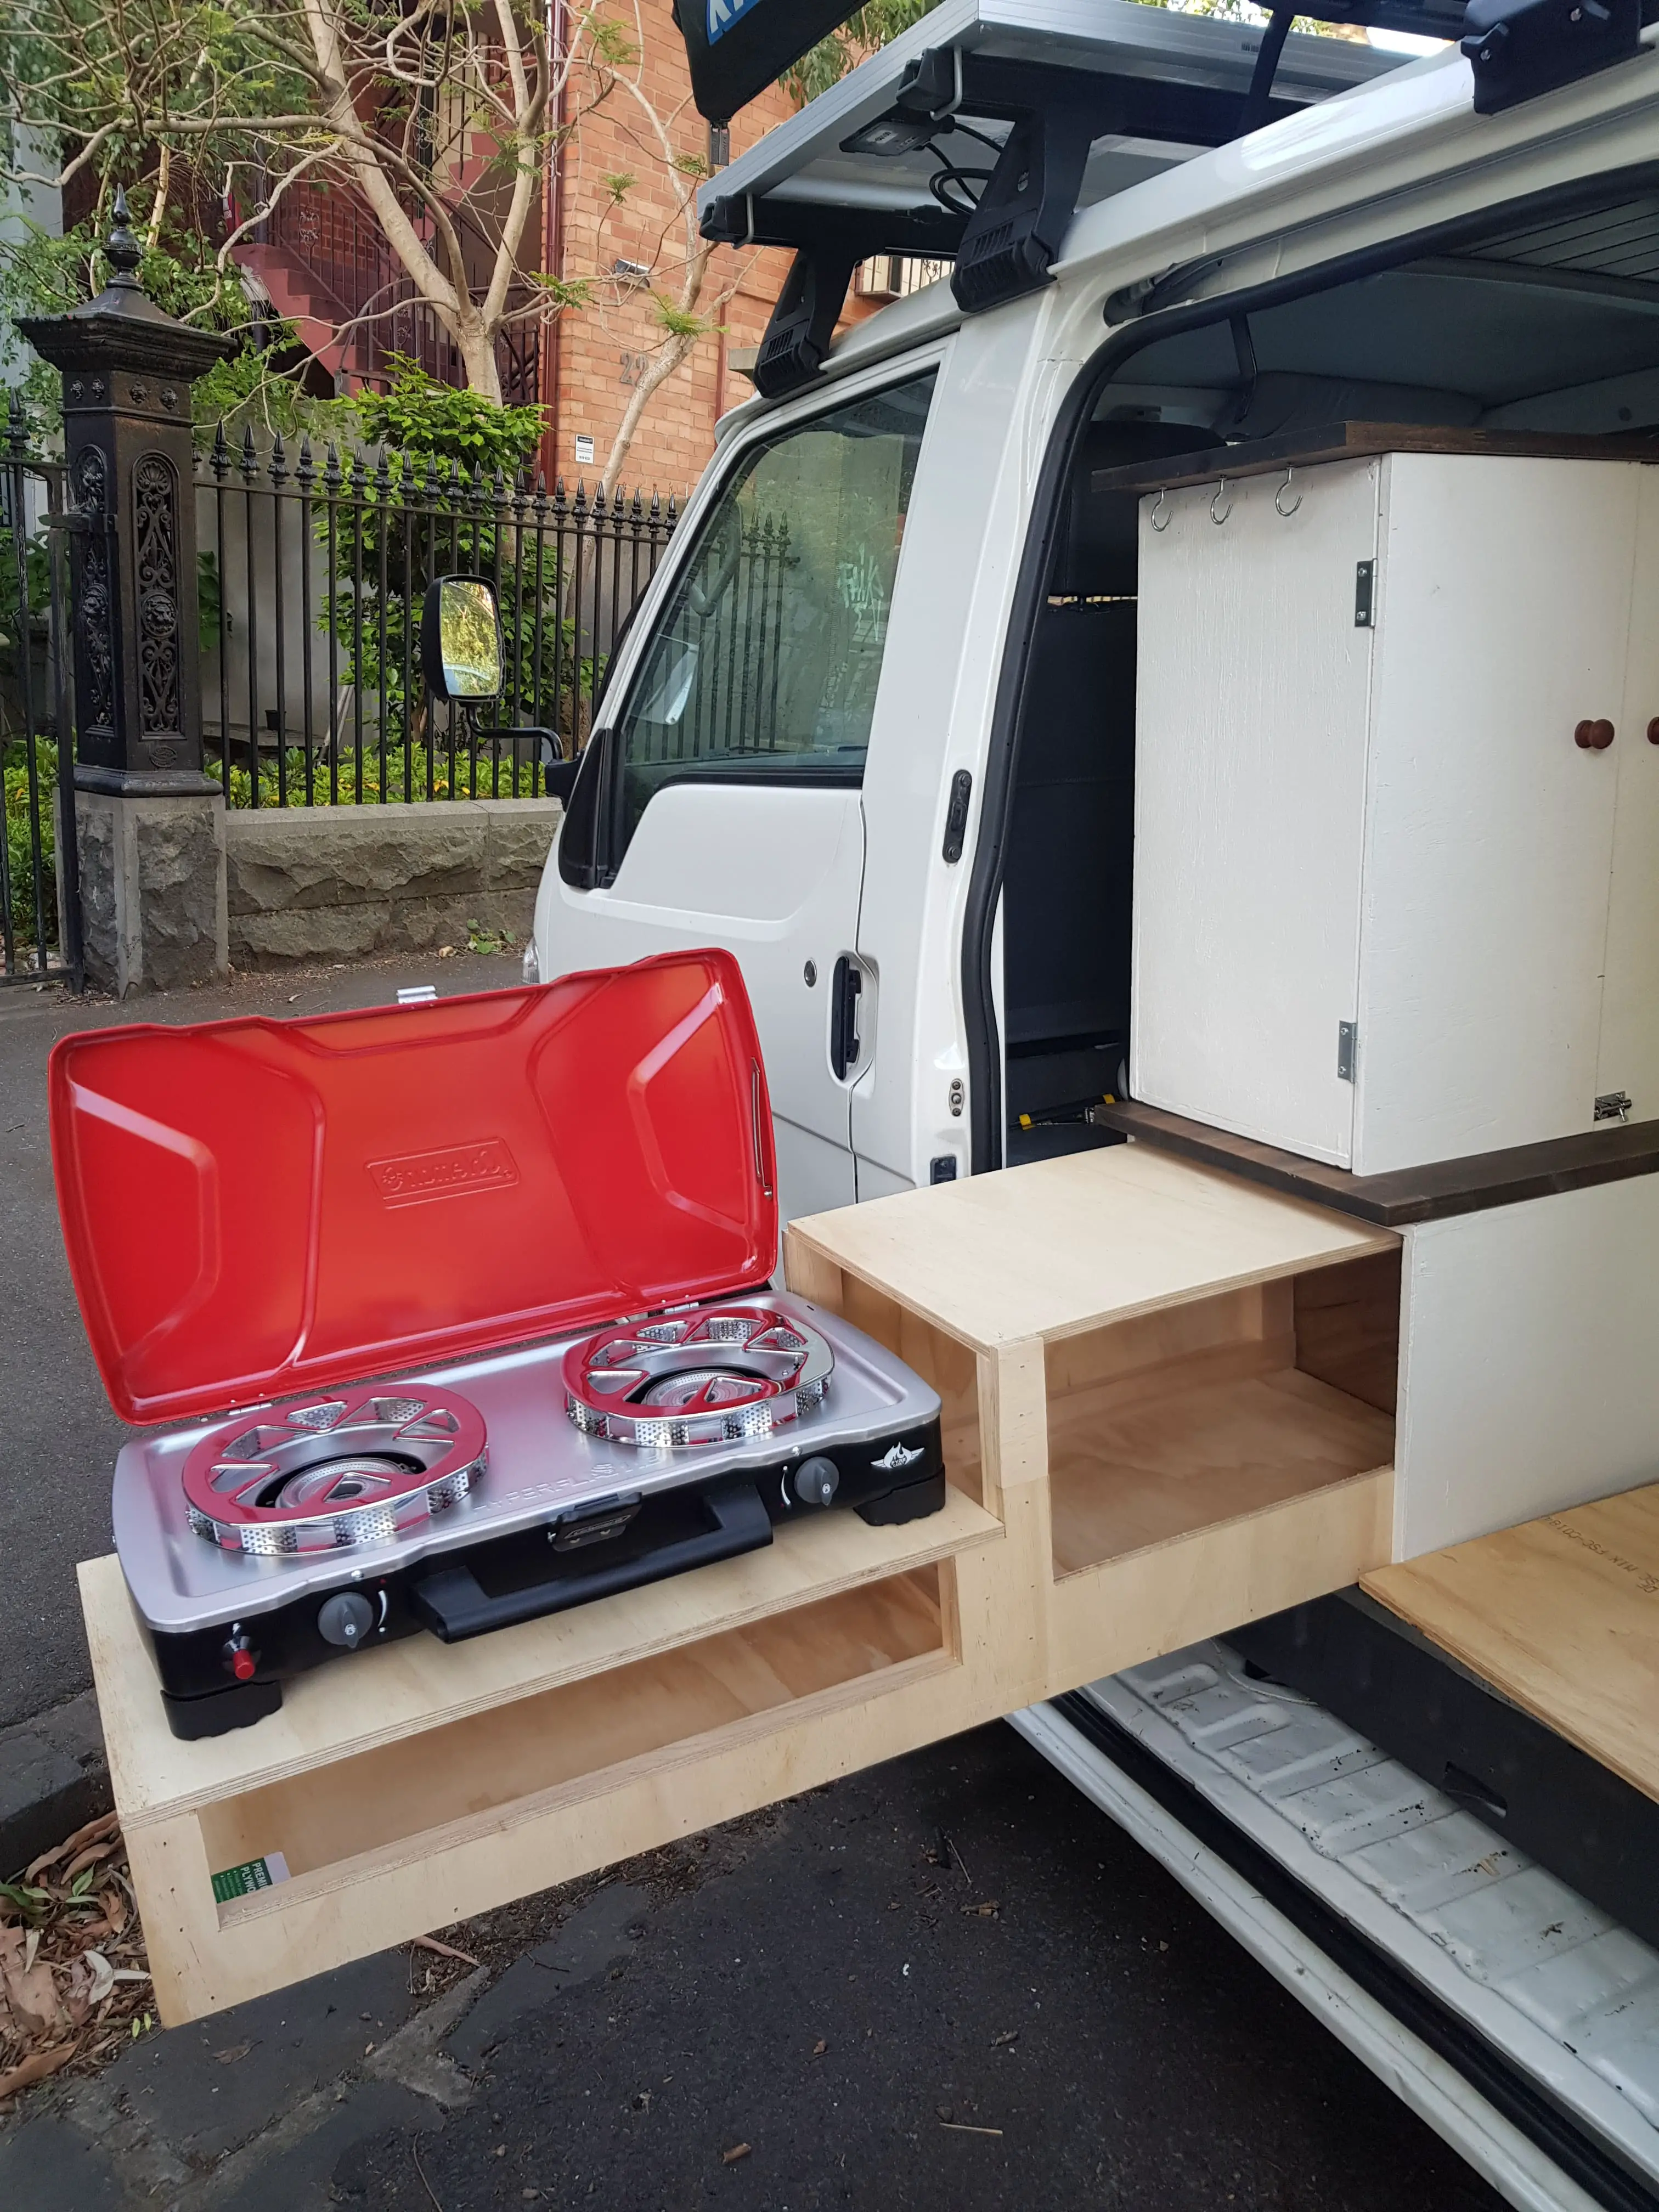
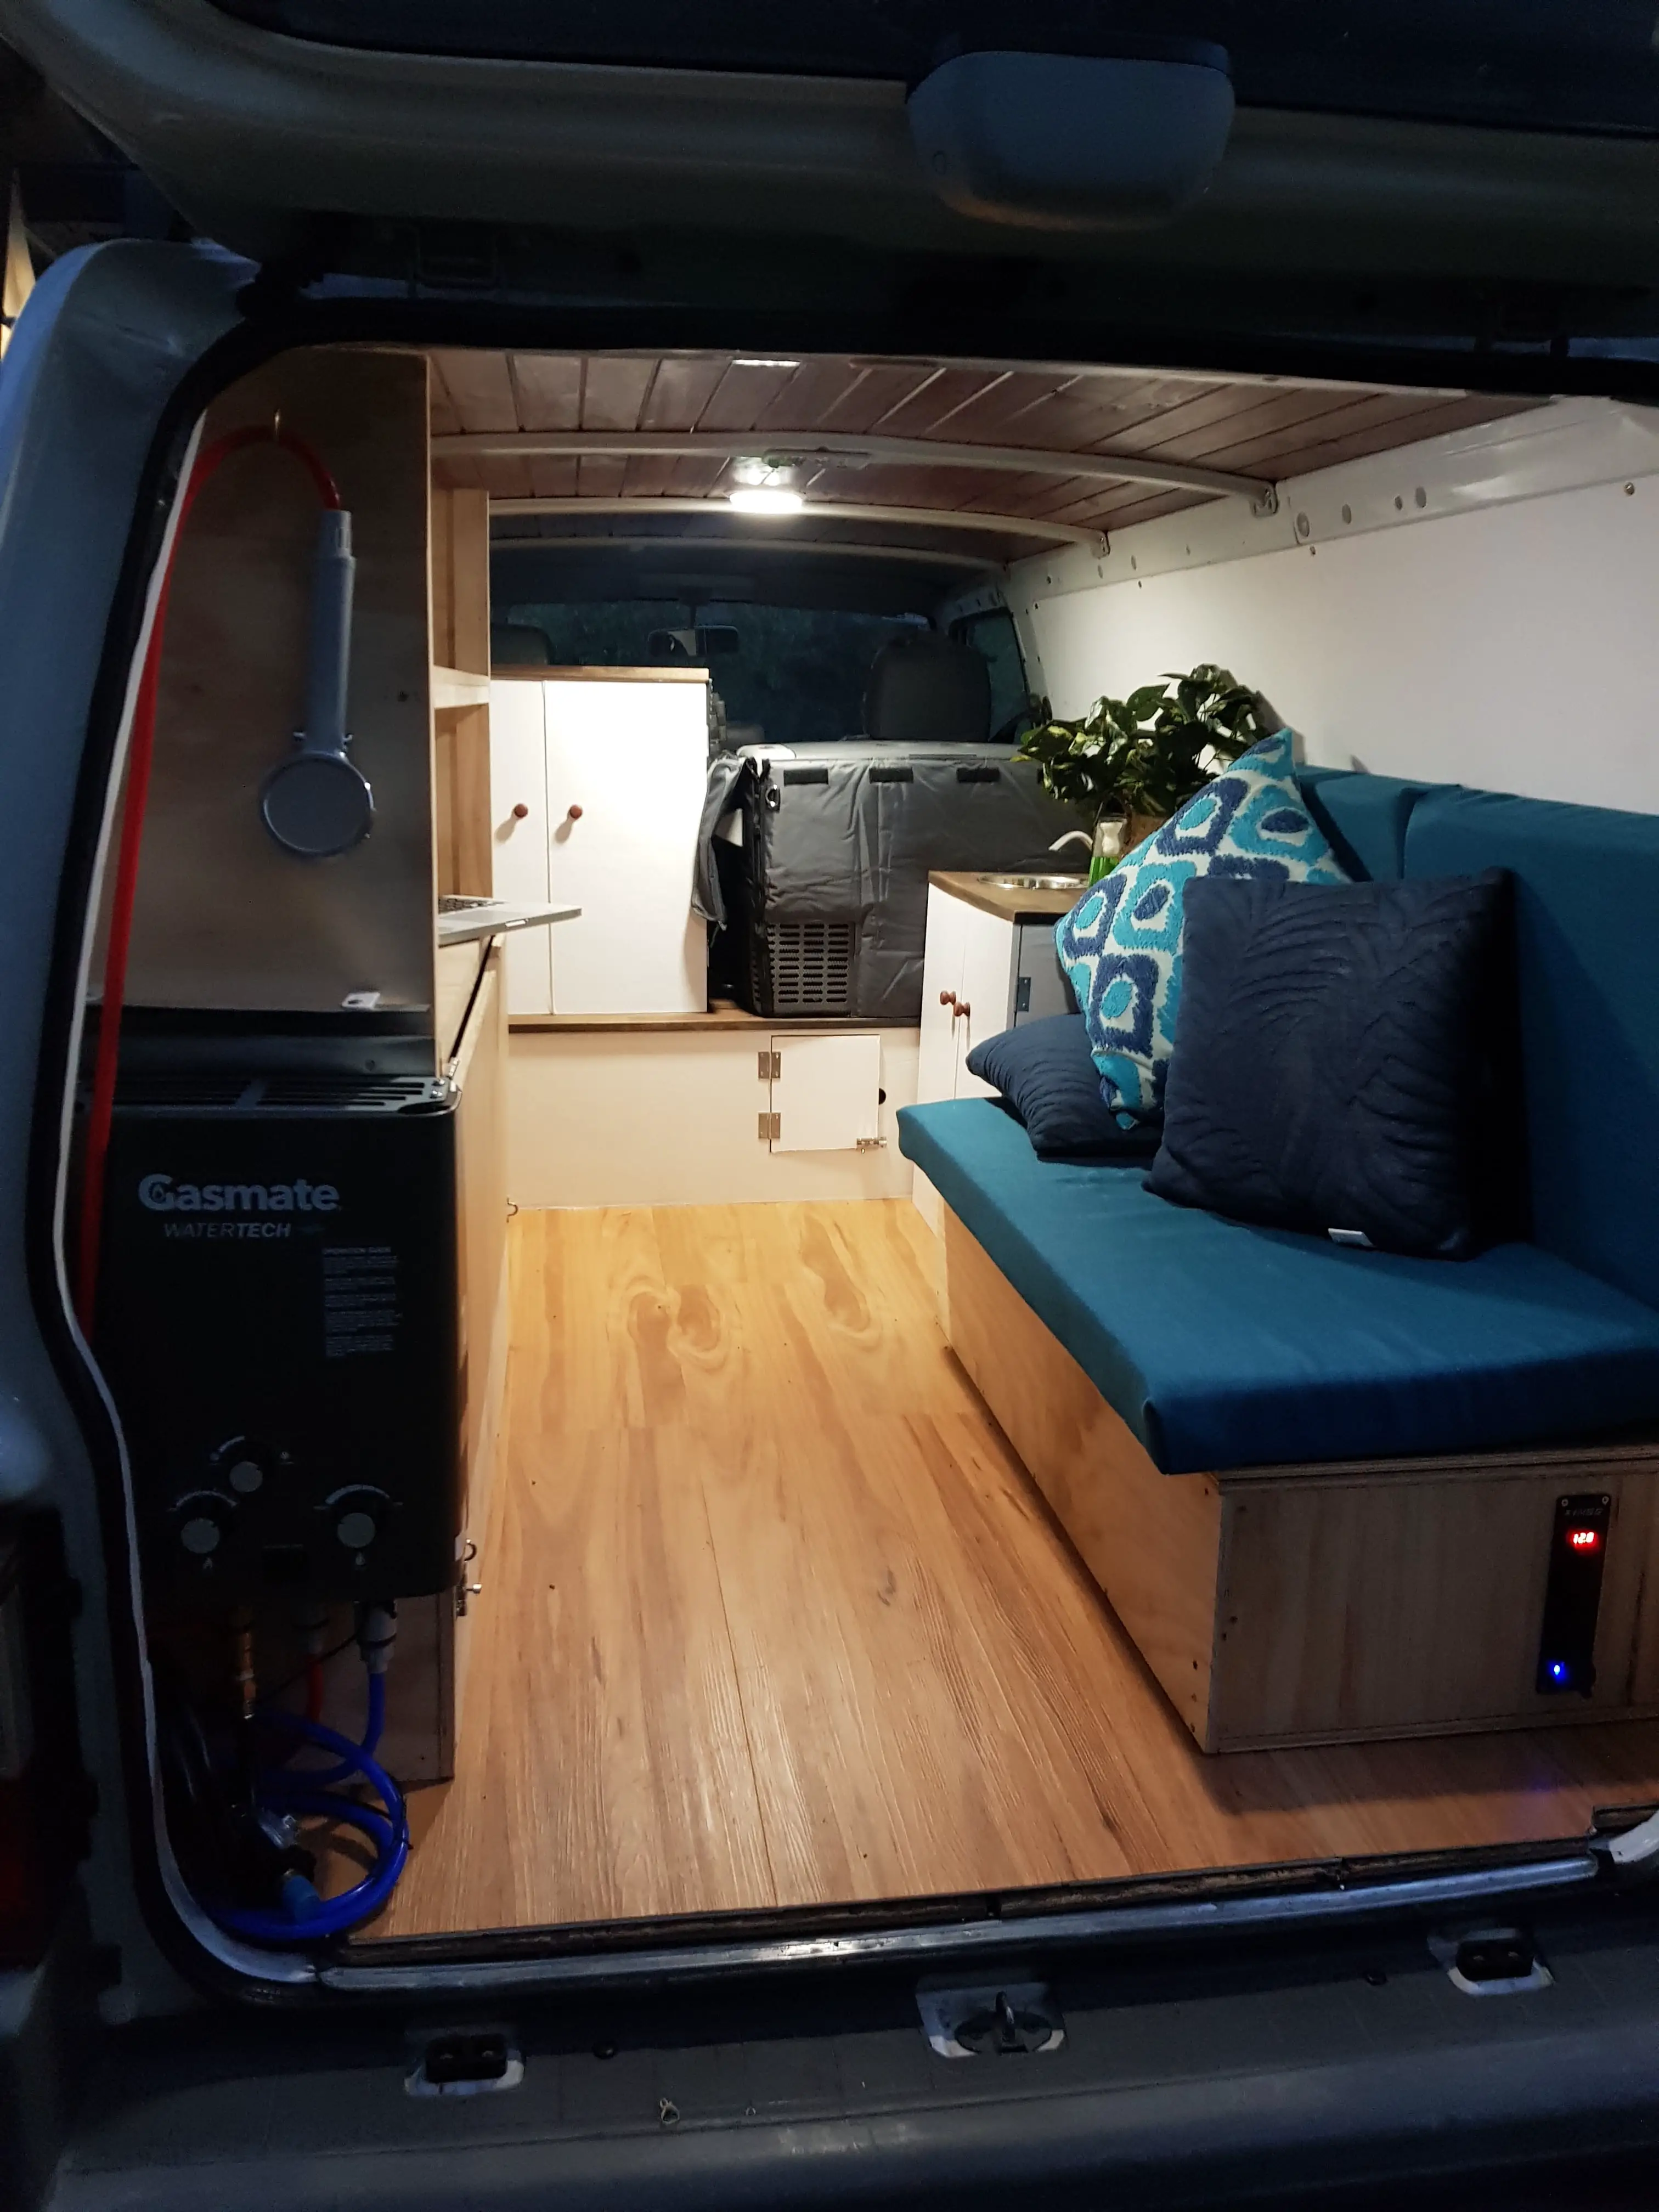
- A pull-out kitchen to the side of the van. Essentially a slide out unit housed inside a hollow unit. At the top of the slide out unit there is a gap where the gas stove sits. Next to the stove is bench space for prepping food. Below the stove/bench space is the pantry/dry food storage. We cut out a small door to the side of the unit, so we can access what is in the panty from inside the van without having to slide the whole kitchen out.
- On top of the kitchen cabinet nearest the door is a storage cupboard.
- Next to the cupboard is a gap which houses the Waeco 50L chest fridge, behind the driver’s seat.
- Next to the fridge along the side wall is a large cupboard which is the sink unit. Inside the cupboard there are two 20L plastic jerry cans of water and a 5L grey water can. We have inserted a metal sink and a hand pump tap on the benchtop.
- Beside the sink is the seating unit which is hollow for storage. The top also folds out and has two legs for support, expanding the sofa to a daybed.
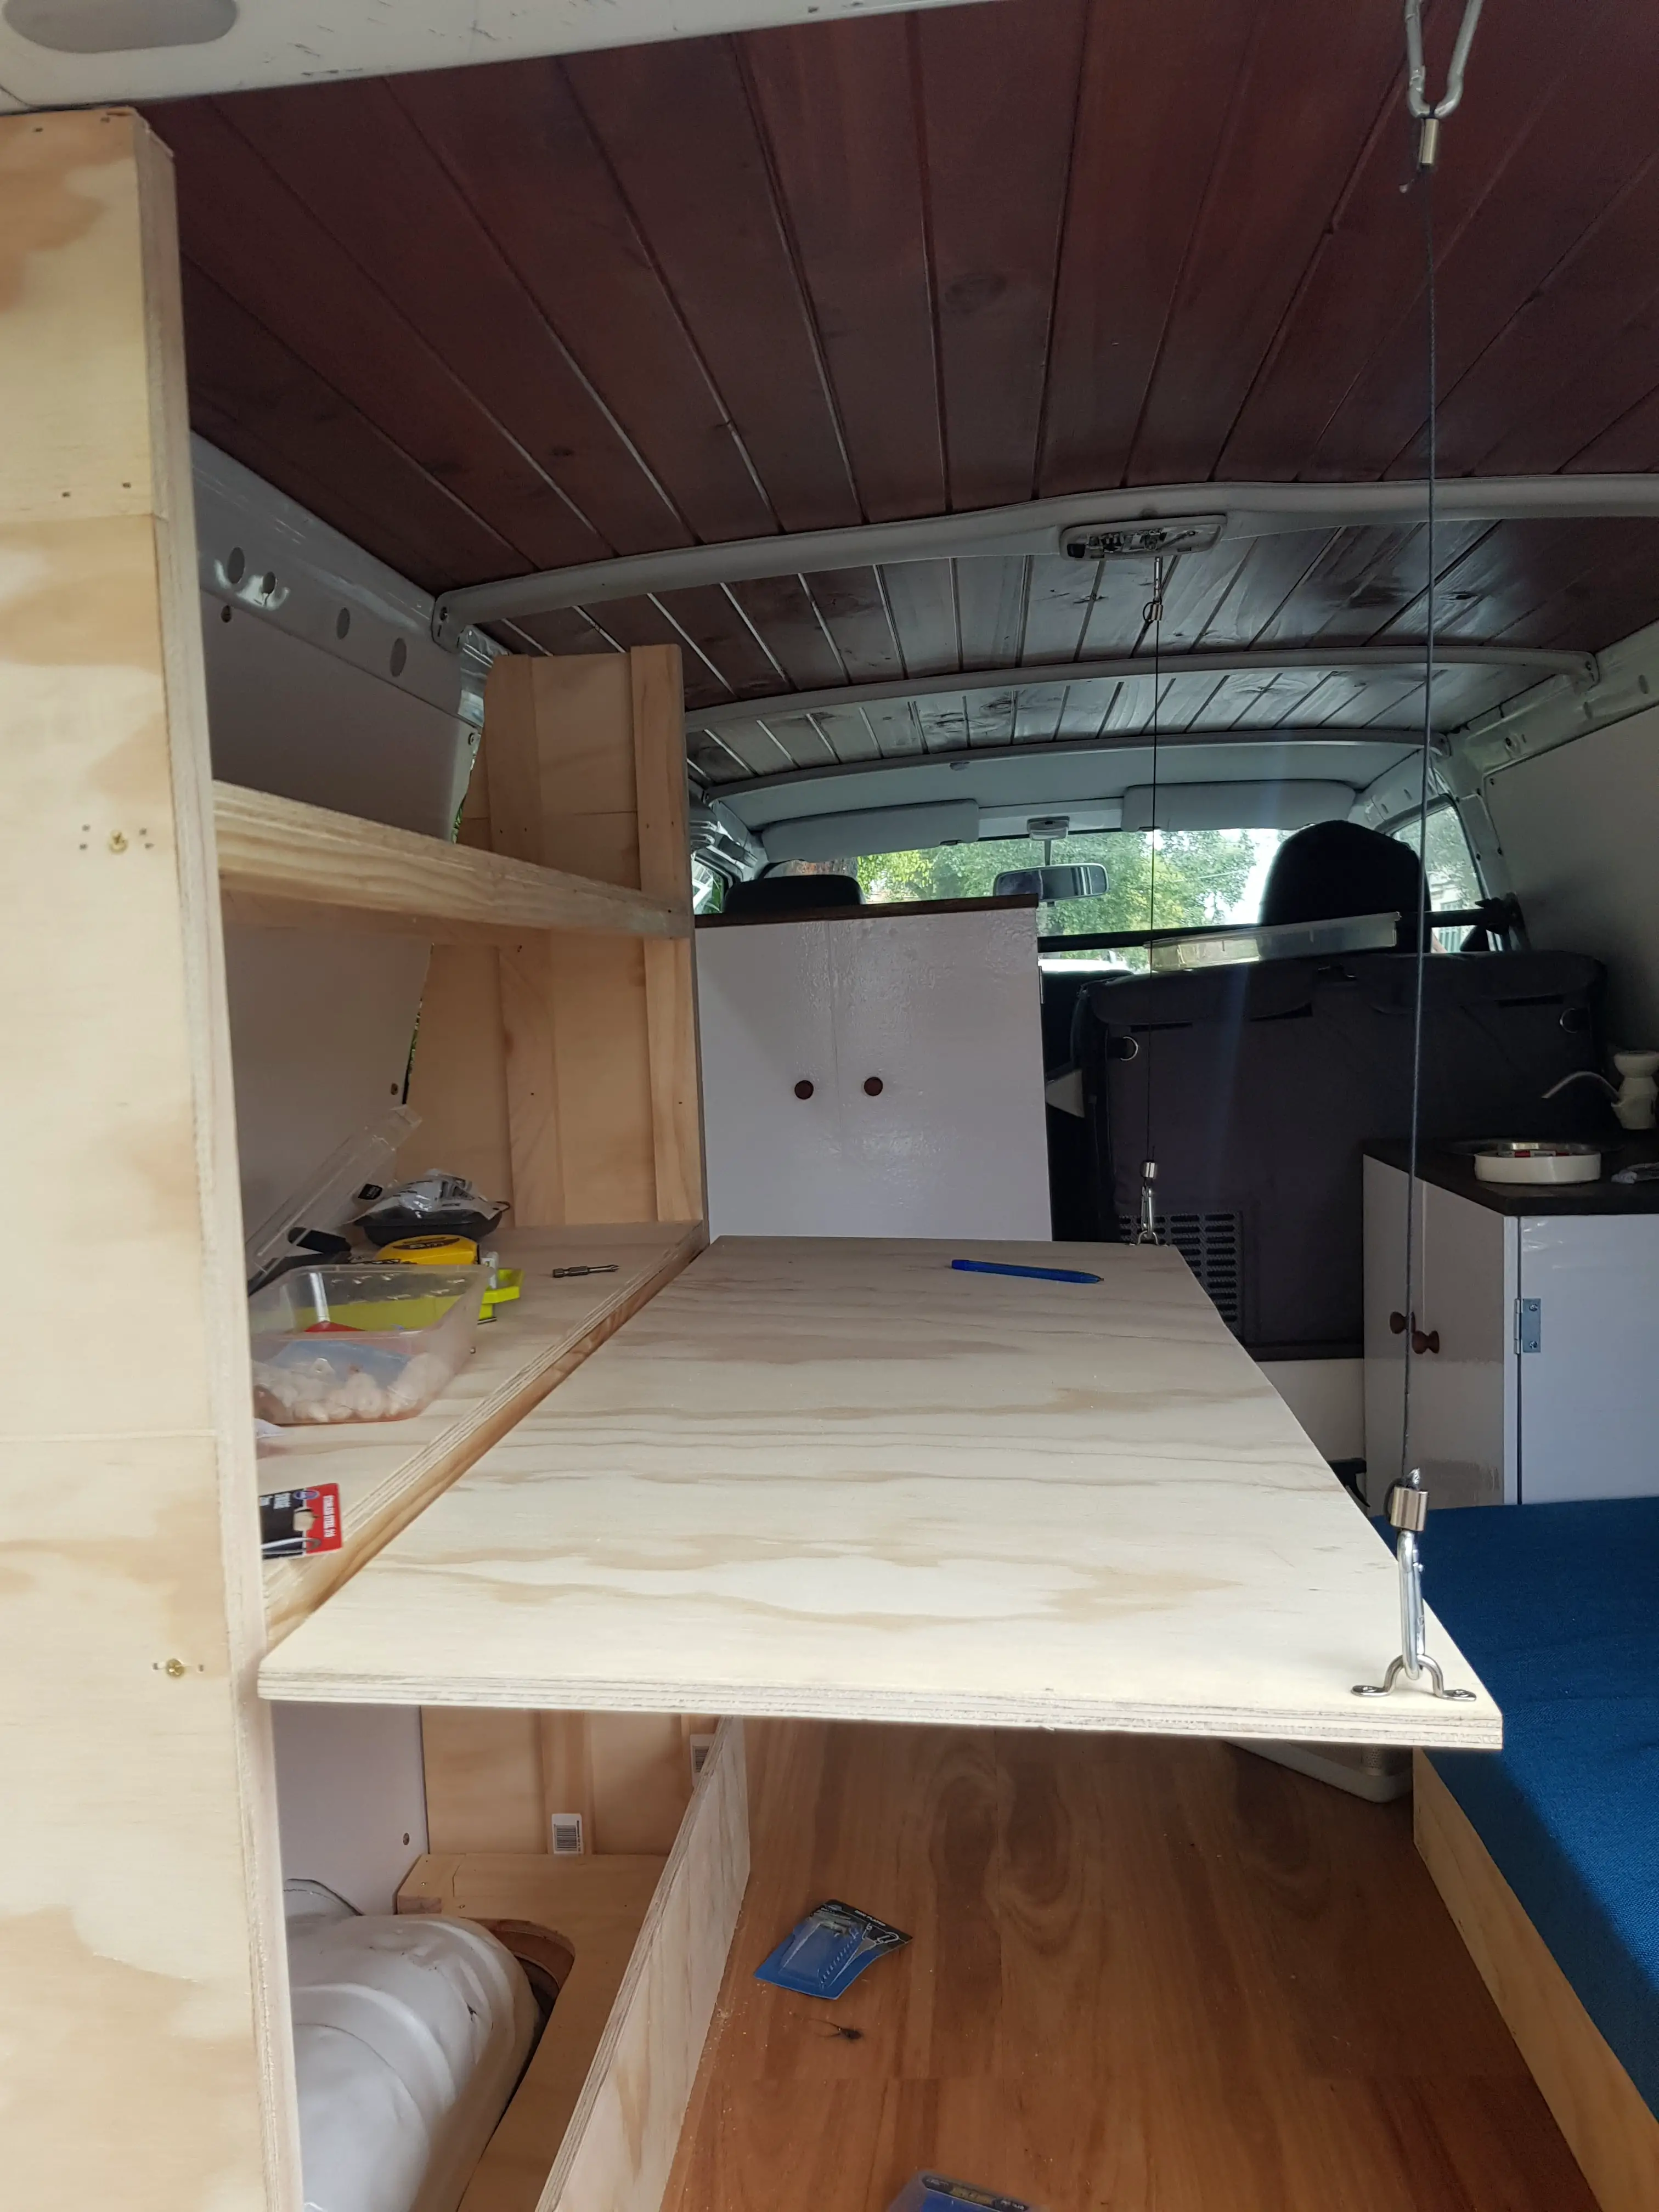
- Opposite the day bed is a shelving unit. The bottom panel has hinges at the top and lifts up to create a table. We hold the table up using wire which has a metal clip either end attaching to two small hooks in the ceiling and two small hooks at the edge of the panel.
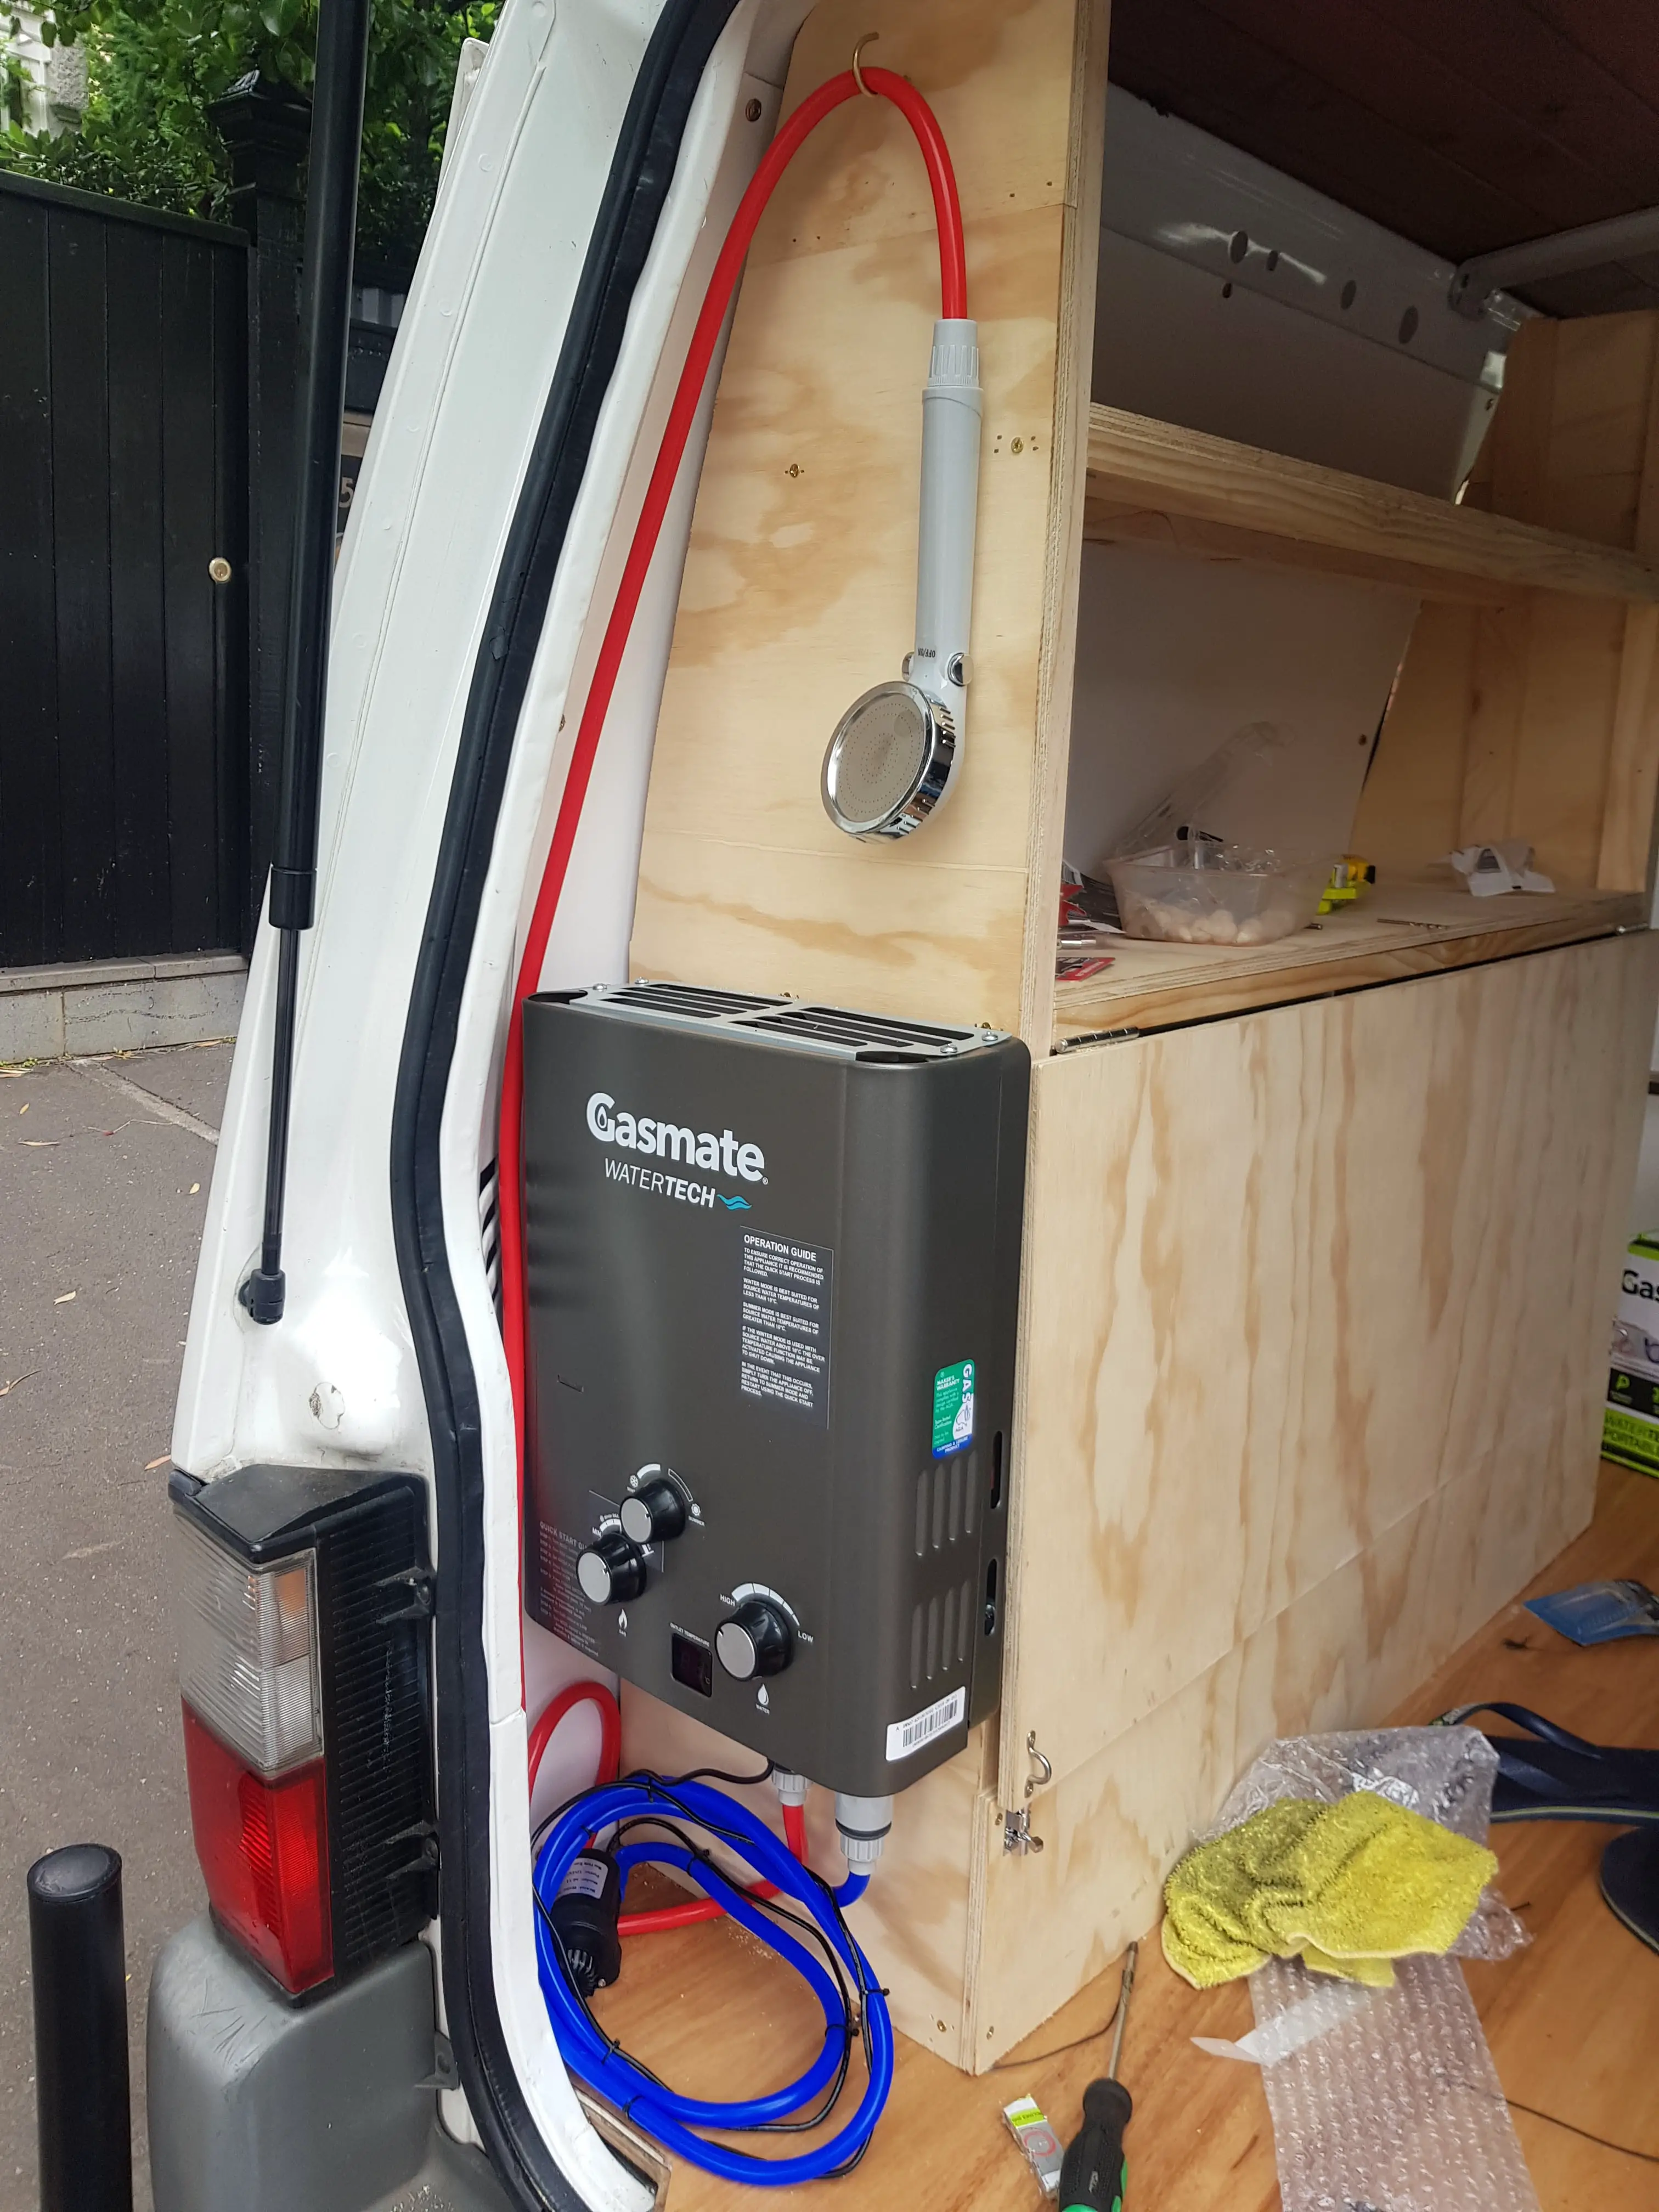
- On the side of the shelving unit, at the back of the van, is a Gas Mate shower. We’ve created a metal heat reflector.
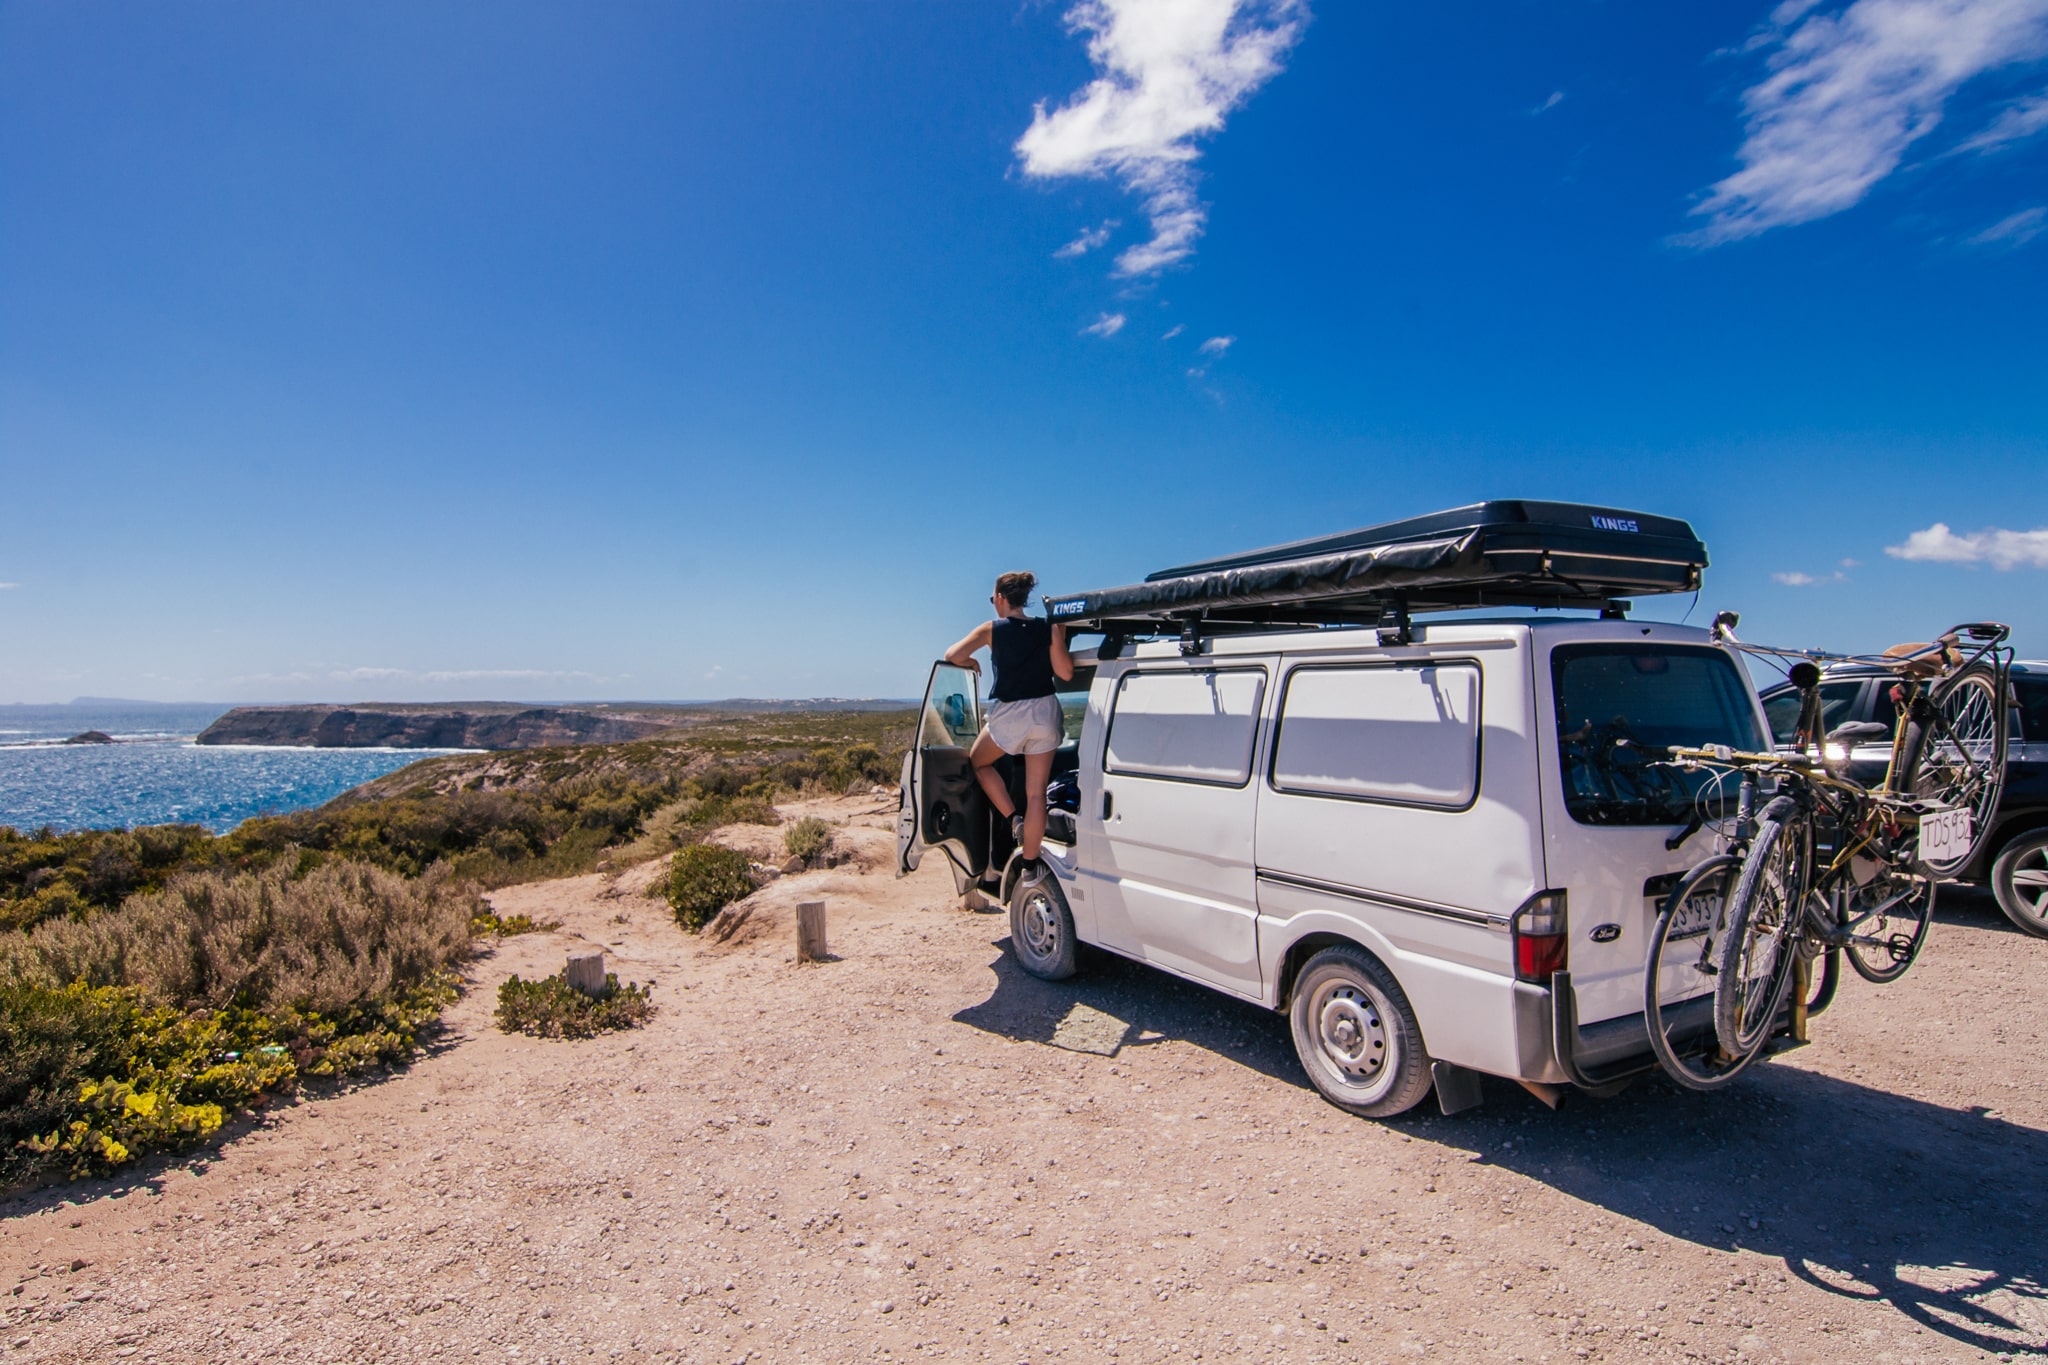
- On top of the van is a Kings pop-up tent for sleeping two people.
- To the side of the van above the sliding side door is a Kings 5x5m awning mounted onto the roof rack which extends dining and living space into the outdoors.
Before I had finalised the layout, we got started right away on fitting out the basics which looked a little something like this:
Van Insulation:
Insulation is necessary no matter where in the world you are to protect you and your van from excessive heat and cold. It’s also a great sound deadener when driving and from rain hitting the outside of the vehicle, especially if you’re planning on sleeping inside.
There are so many different types of insulation available. There are natural fibres such as sheep wool and man made ones like closed cell foam.
I initially wanted natural wool insulation but the more I looked into it, the more impractical it seemed. For wool to have any effect, you have to have tonnes of it. Not only is wool van insulation expensive for such large quantities, I couldn’t afford the space.
In a small van, every inch matters and losing 2-3 inches on the walls and ceiling due to packing it with wool before the walls was out of the question.
Instead, I opted for two rolls of 10mm thick closed cell foam with a foil face. Being located in Australia, I bought this from Car Builders for $139 per roll. It has a sticky back so it conveniently sticks tightly wherever you put it and the foil side sits on the outside. I sealed the pieces together with silver foil tape I bought from the same supplier.
The silver foil closed cell foam was a great option for my small Econovan camper as you can be really precise with where you put it, it’s neat, easy and doesn’t take up unnecessary space. We stuck the insulation all on the full length and width of the ceiling and all the cavities of the walls (my van has no side windows so there were plenty of cavity spaces).
We decided not to insulate the floor. We had kept the wooden protector the van came with and then laid nicer wooden flooring on top, so we felt another layer underneath was a bit excessive. In hindsight we could have done as we had a few metres of insulation spare afterwards, but we haven’t noticed an issue with noise or temperature.
The results of the closed cell foam acoustic and thermal insulation in my Ford Econovan have been impressive. On hot days we absolutely notice what a difference it has made. The van never gets too hot and it’s pretty cosy on cold days too. We have never had an issue with condensation or dampness.
When the van was empty when I first bought it, it did sound really tinny and the engine noise was pretty loud. However this insulation has definitely made a drastic difference to the acoustics.
Wooden Ceiling

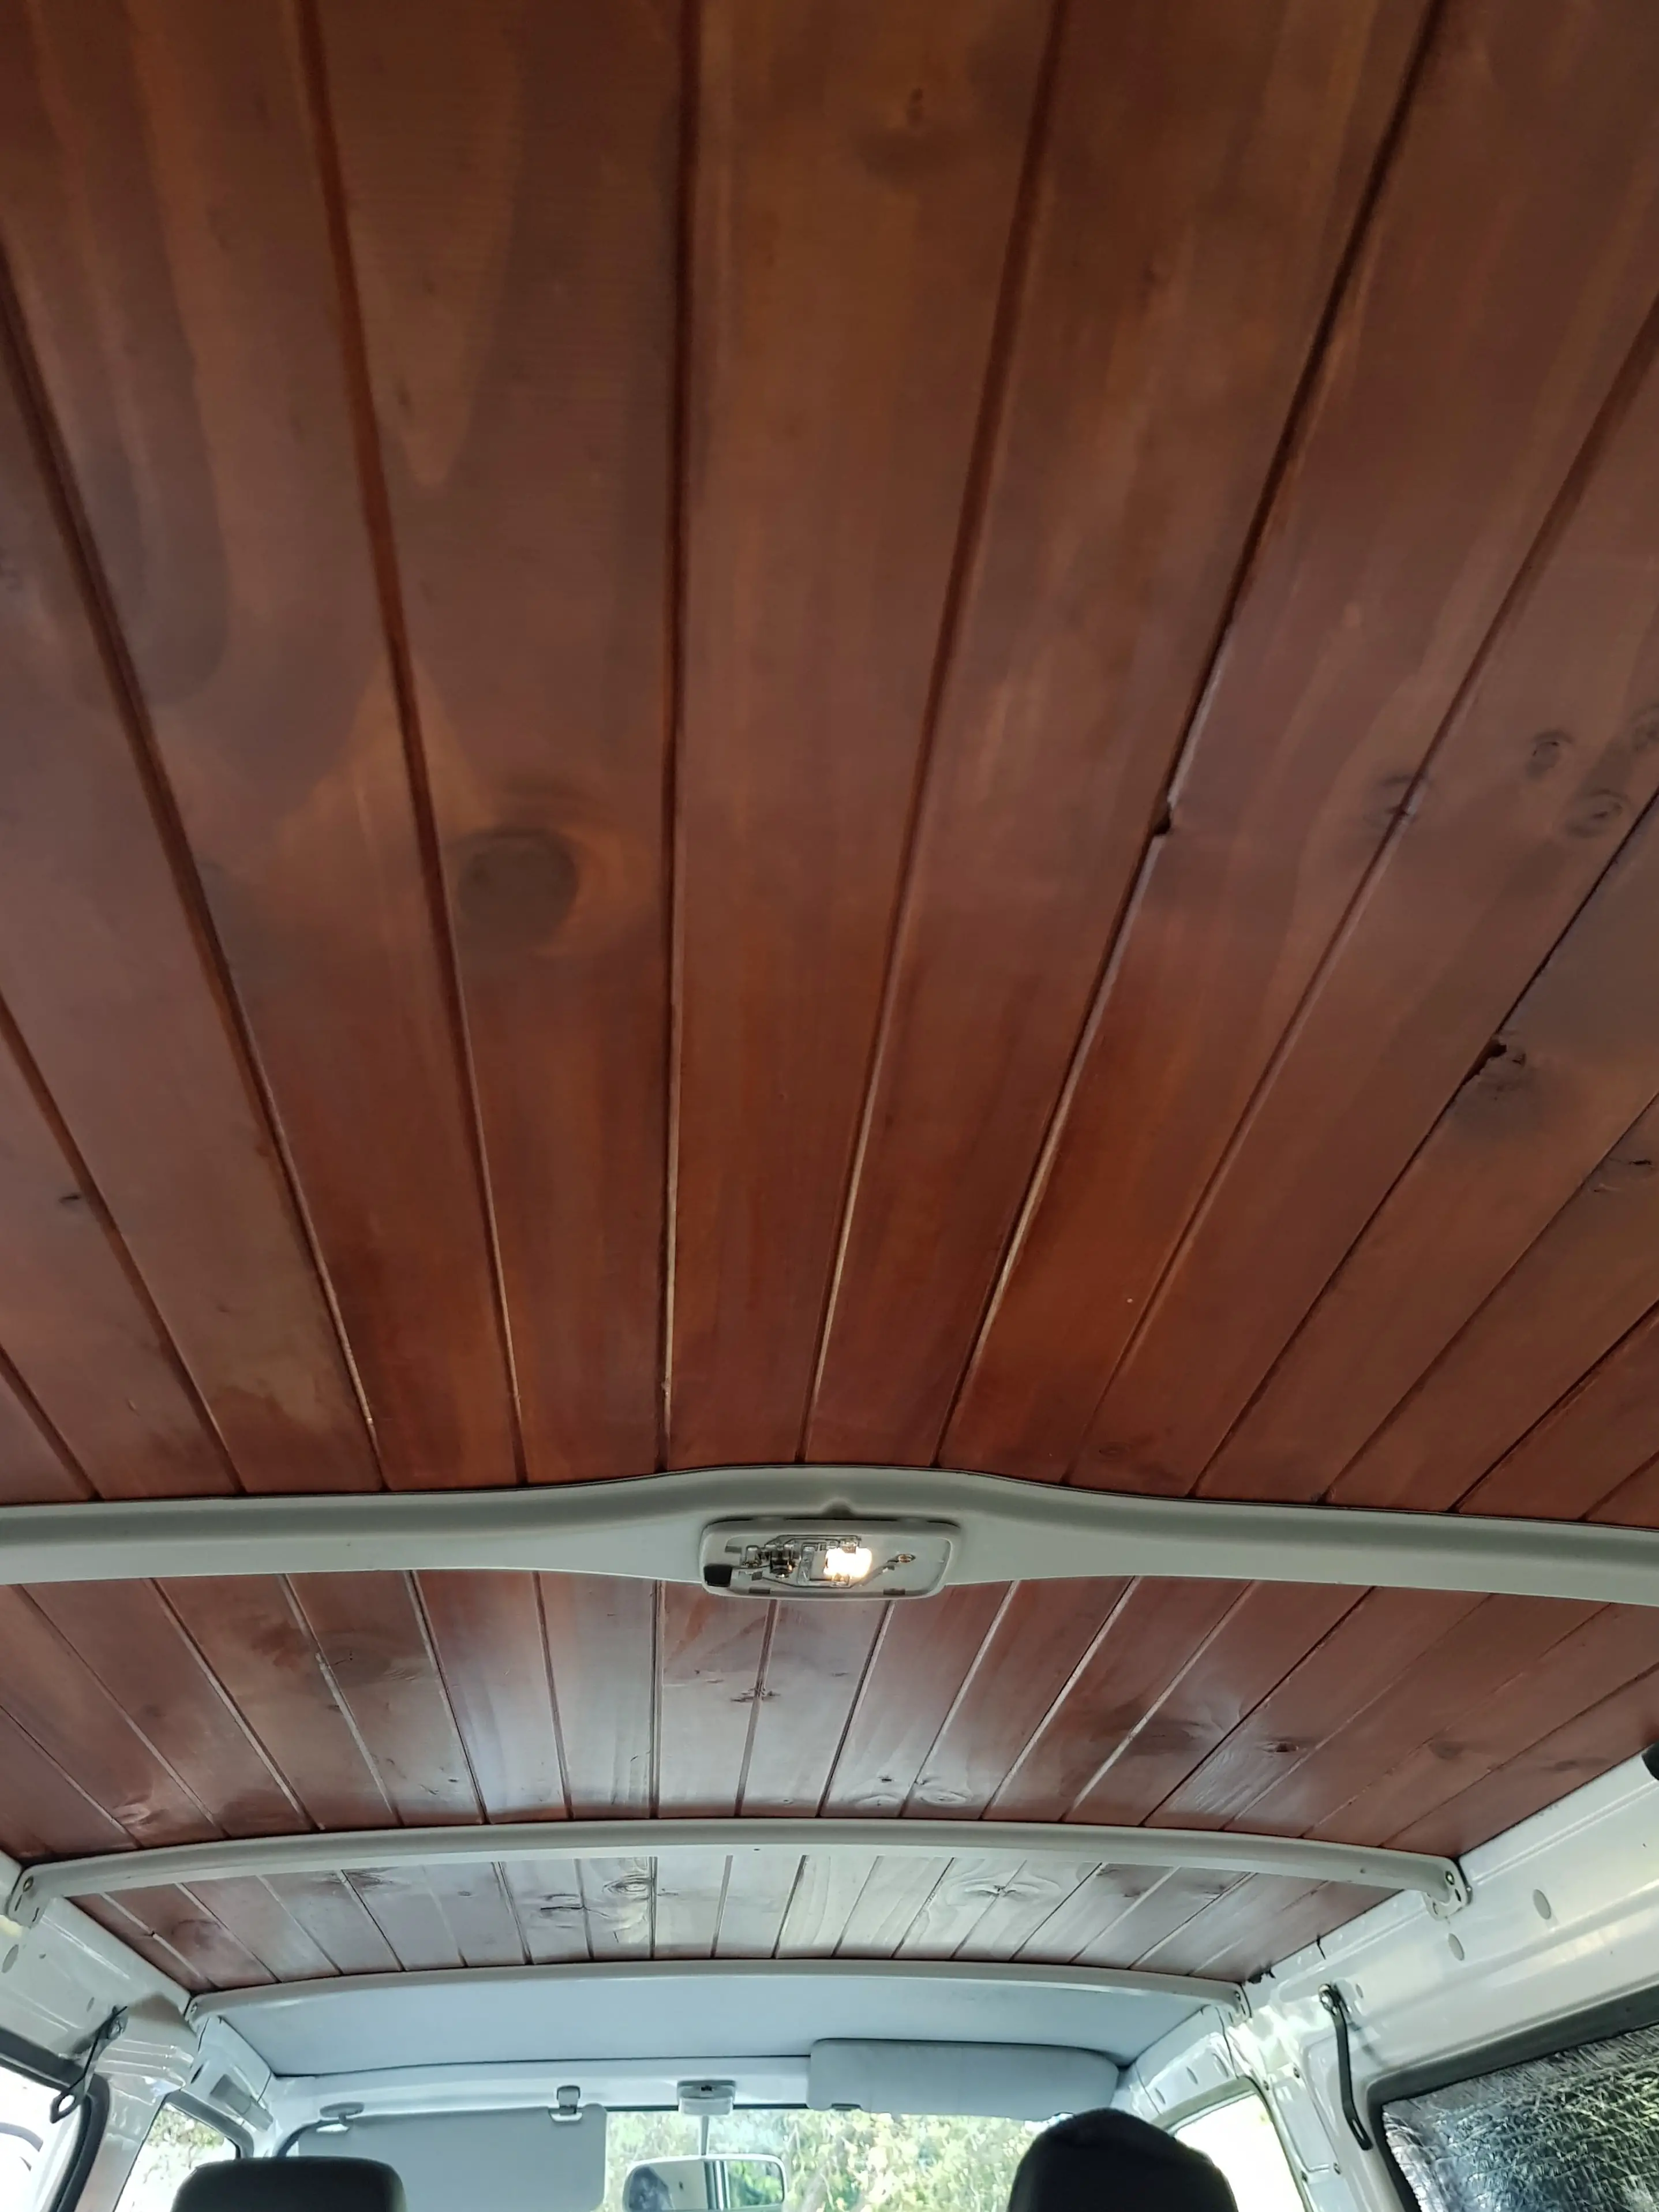
Before I even knew what materials I wanted for the walls or had even finalised the layout, I knew I wanted dark wooden panelling for the ceiling.
As I was building my Ford Econovan on a budget, I couldn’t justify spending $500+ on nice, expensive Redwood or similar high quality, naturally dark wood.
Instead I was a cheapskate and bought pine planks for about $75 from Bunnings and a pot of wood stain to do them myself!
Once the planks were cut to size, we put down a couple of plastic sheets in our dining room (as we have no garage or shed to do any van work!) and got to work staining and sealing.
The planks had tongue and groove joints so semi-locked together and wedged nicely between the gap between the roof insulation and top of the metal wall, where the previous cardboard ceiling sat. However it was at least a two person job to ensure one person is holding the planks up at all times!
We considered fixing the wooden planks to the roof itself but afraid of creating holes that could go rusty or leak, we decided to keep the slightly ugly metal crossbars that held up the old cardboard roof and use them to lock the new ceiling in place. All that was required was drilling small, shallow holes a bit further down the crossbars from the original holes, which wasn’t a big deal.
That means I also kept the wiring for the interior light which sits in the middle of the back section of the van, and can be used if necessary.
I planned to paint the crossbars at some point but it’s something that I never got around to. Besides, I have got used to it now and it doesn’t really offend me that much. As I said, it was never going to be a completely Instagram worthy van!
Van Power & Solar
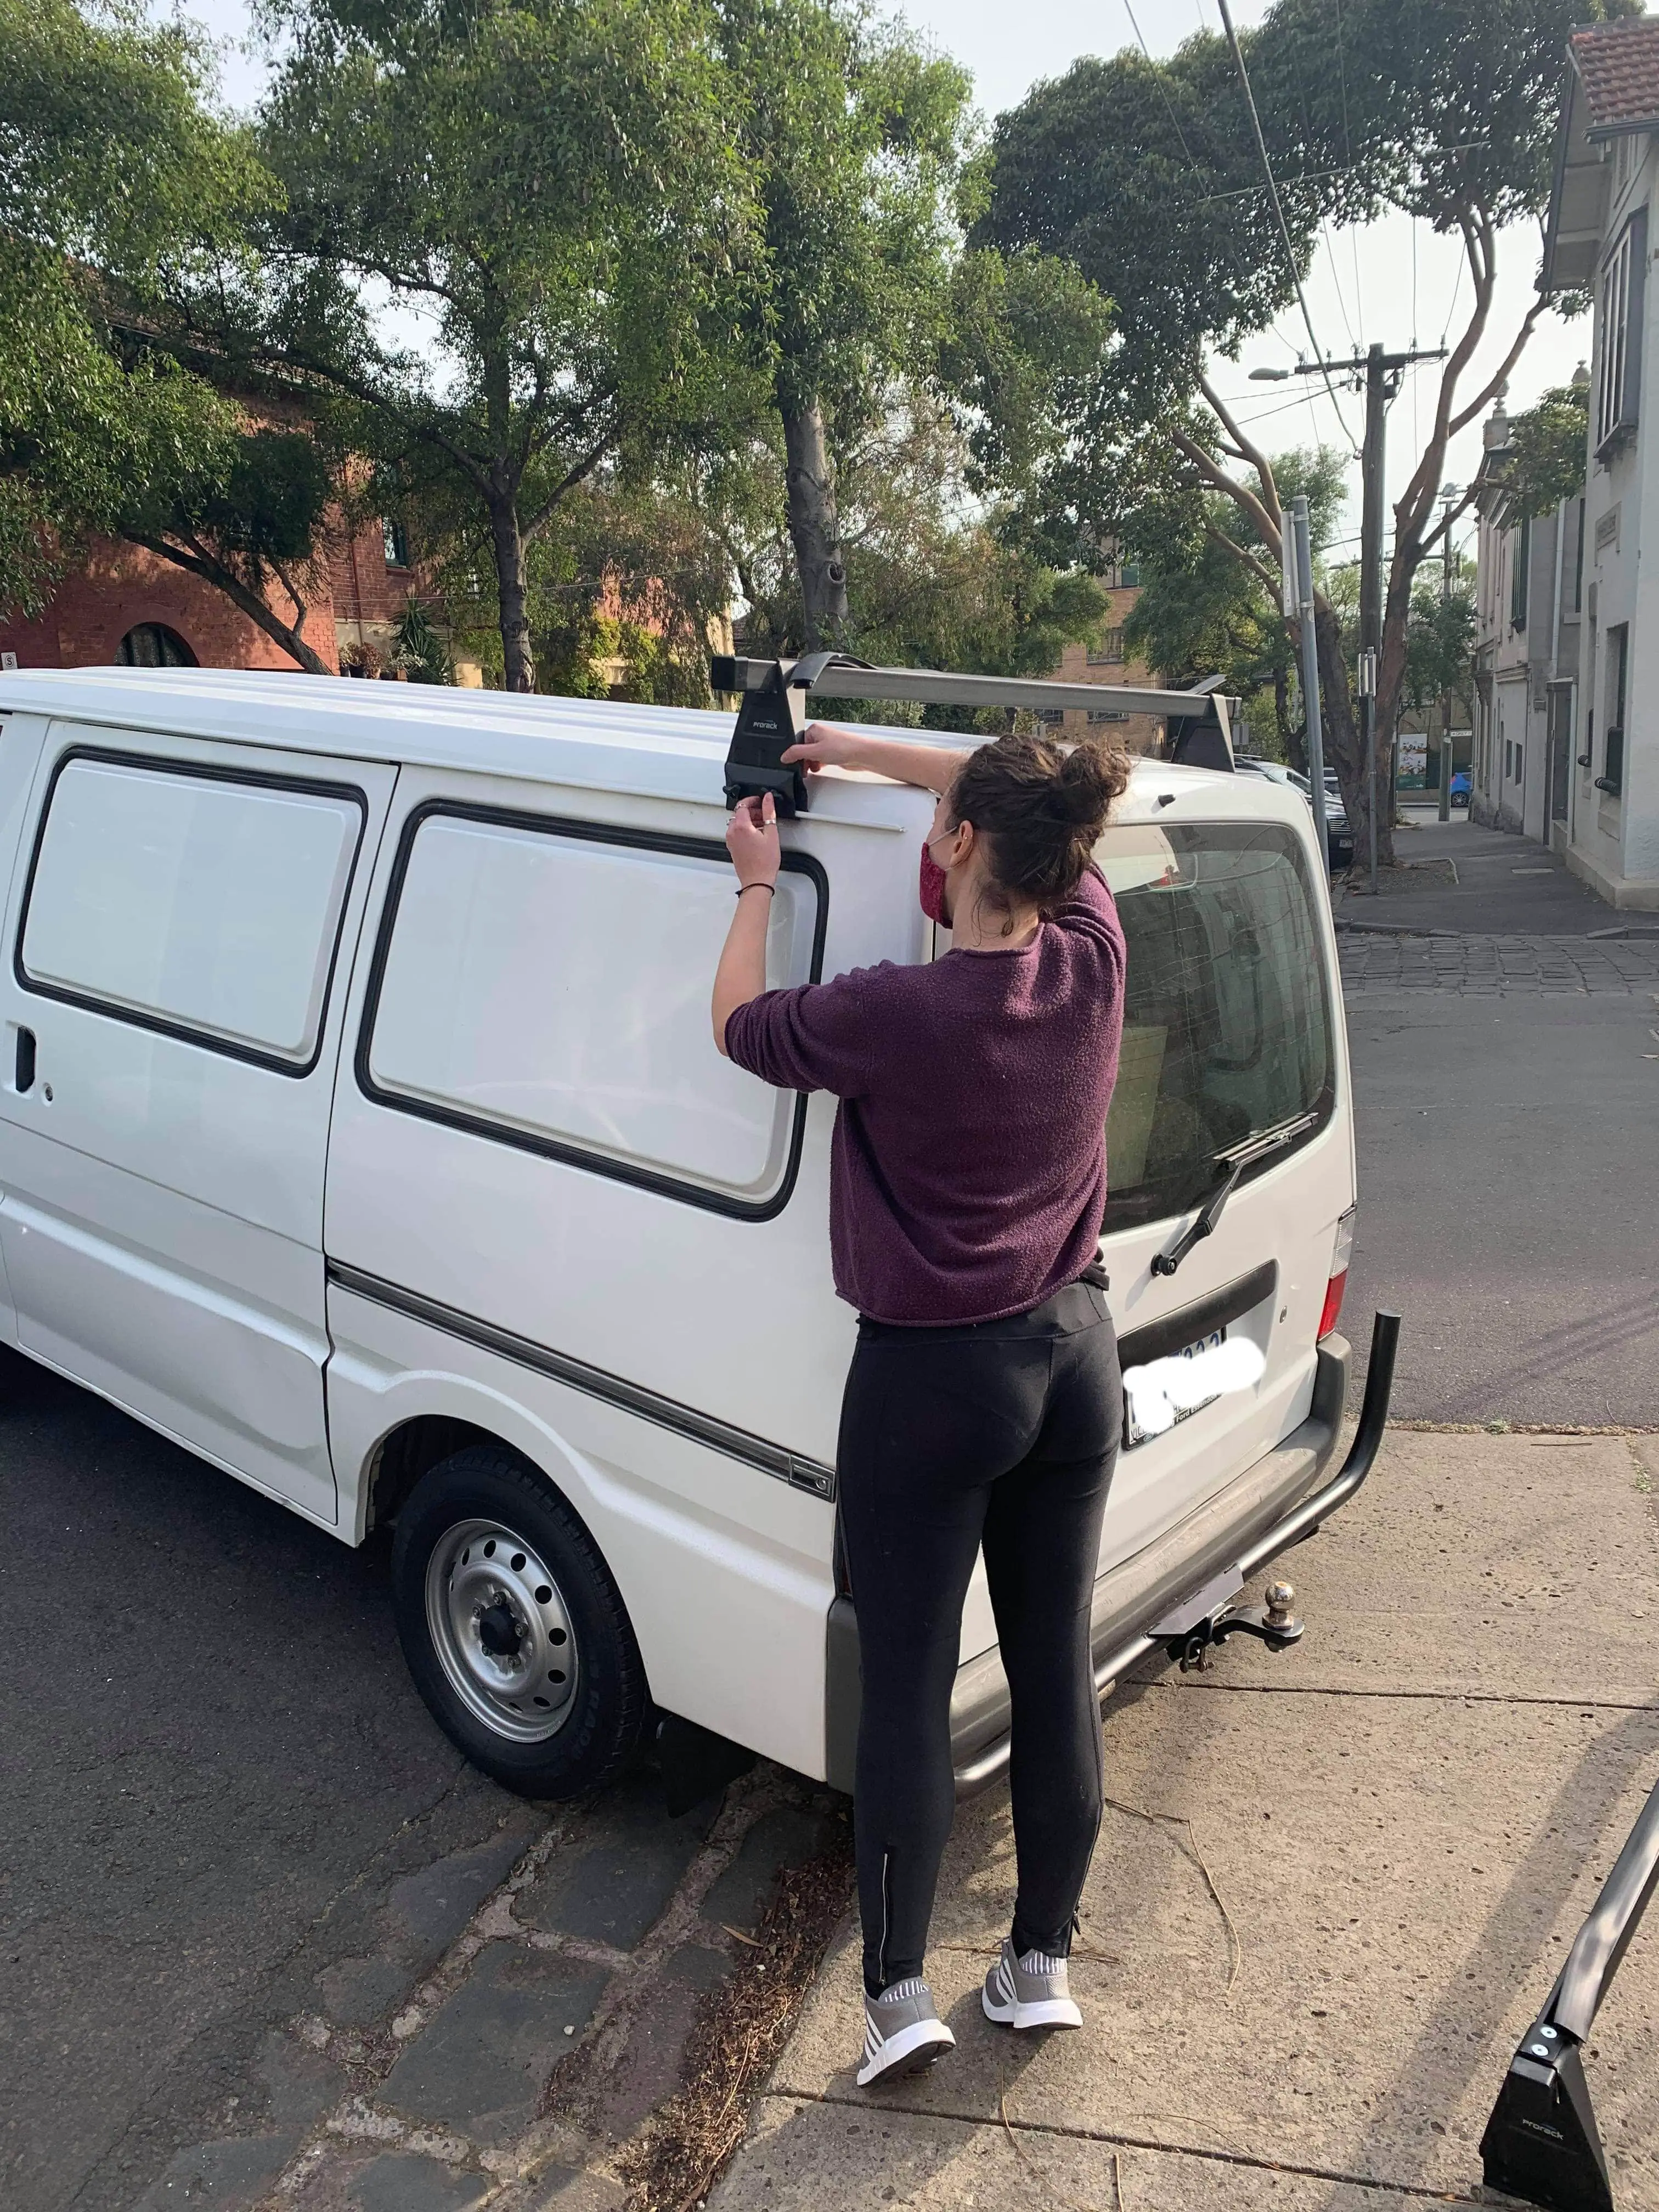
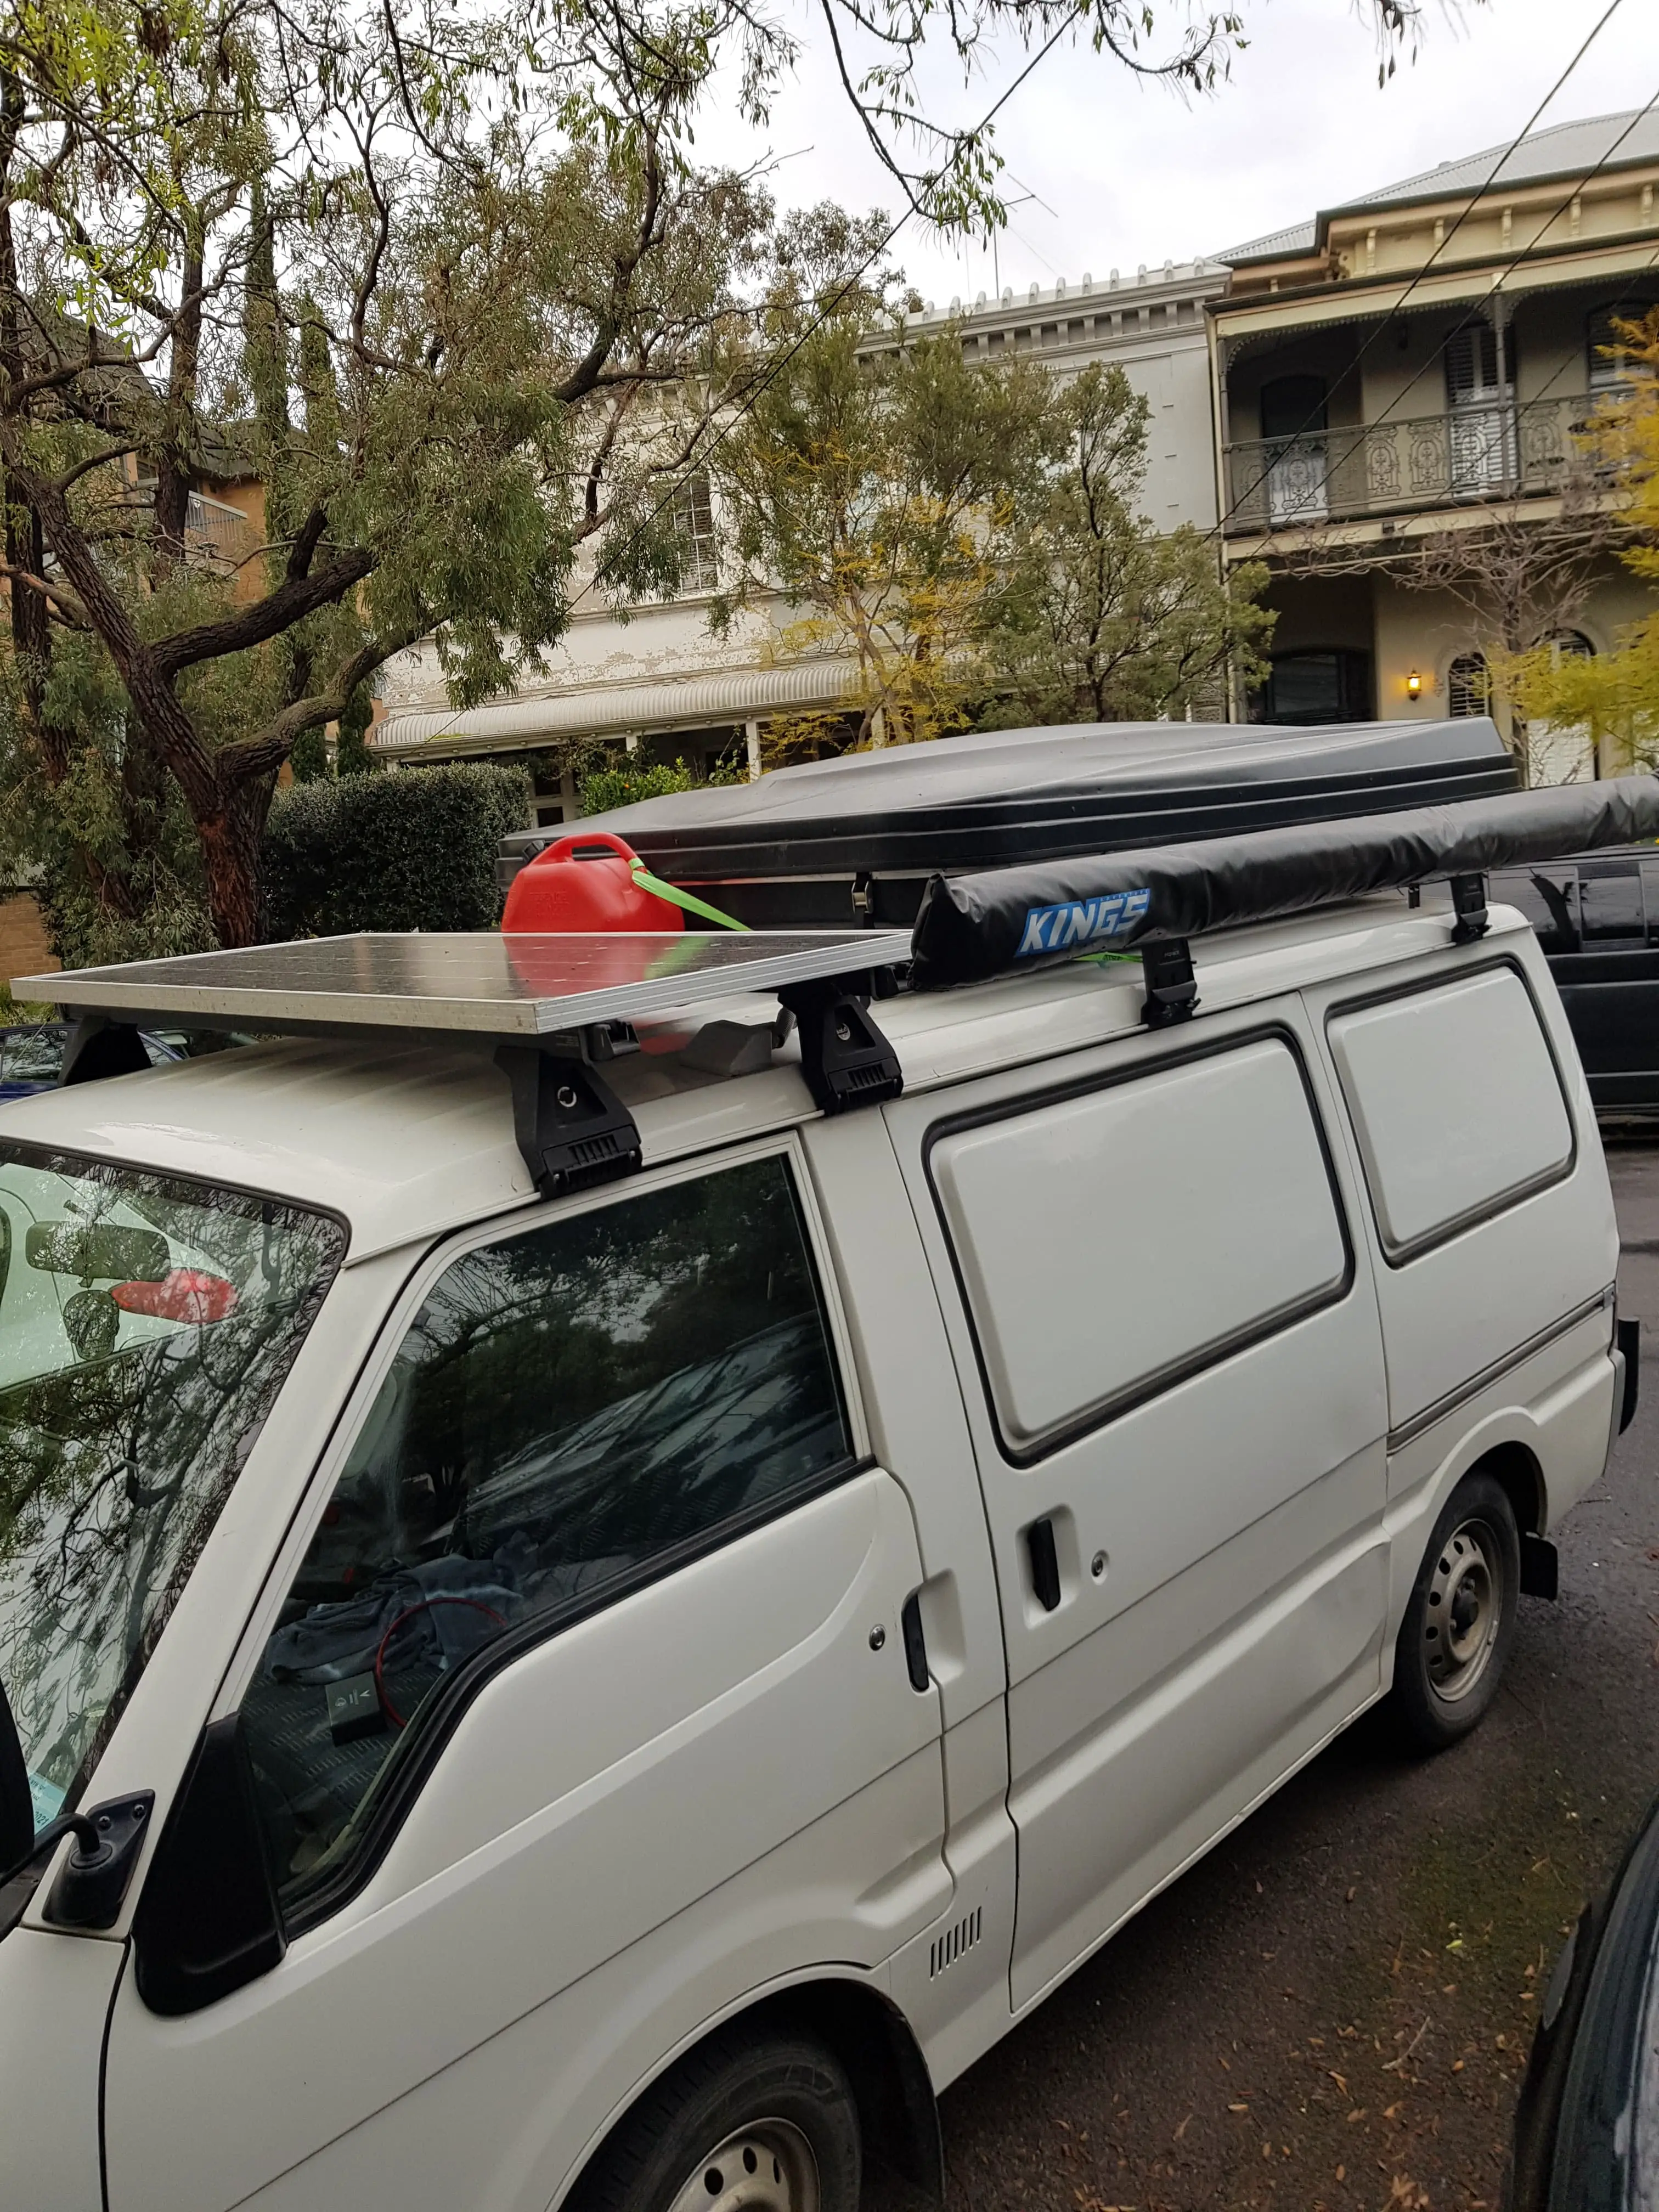
In front of the rooftop tent we mounted a set of roof racks purchased second-hand from Gumtree for under $100. Again, we ensured they complied with the weight rating of the solar panel.
We went for a single 200W monocrystalline Giant Power solar panel, 140amp battery and accessory package bought from Aussie Solar and Batteries for $1,060. My partner ran the cabling for two touch-activated rooftop LEDs and a rear power assembly which he inset into the end of the sofa bench, consisting of two USB’s and a cigarette socket.
These were hooked up to a 12V Kings central switch box which we mounted behind the passenger seat on the rear of a cupboard. The switchboard cost $150 which also has additional power sockets running the Waeco 50L fridge, fan and other accessories.
We started off with one battery but decided to later add another and upgrade the electricals as sometimes we ran the battery a bit too low for comfort (which is not healthy for the battery unless you’re using lithium). We upgraded from a PWM solar regulator to a Victron MPPT solar regulator which has built in Bluetooth, allowing us to monitor solar input and output easily.
We also added a Victron DC/DC charger which charges the battery when the vehicle is running. Like the regulator, it also has Bluetooth, allowing easy monitoring of the battery status and charge.
For winter trips, overcast days or just in case we use a large amount of power, we now have the peace of mind knowing we can recharge simply by running the engine.
Van Flooring
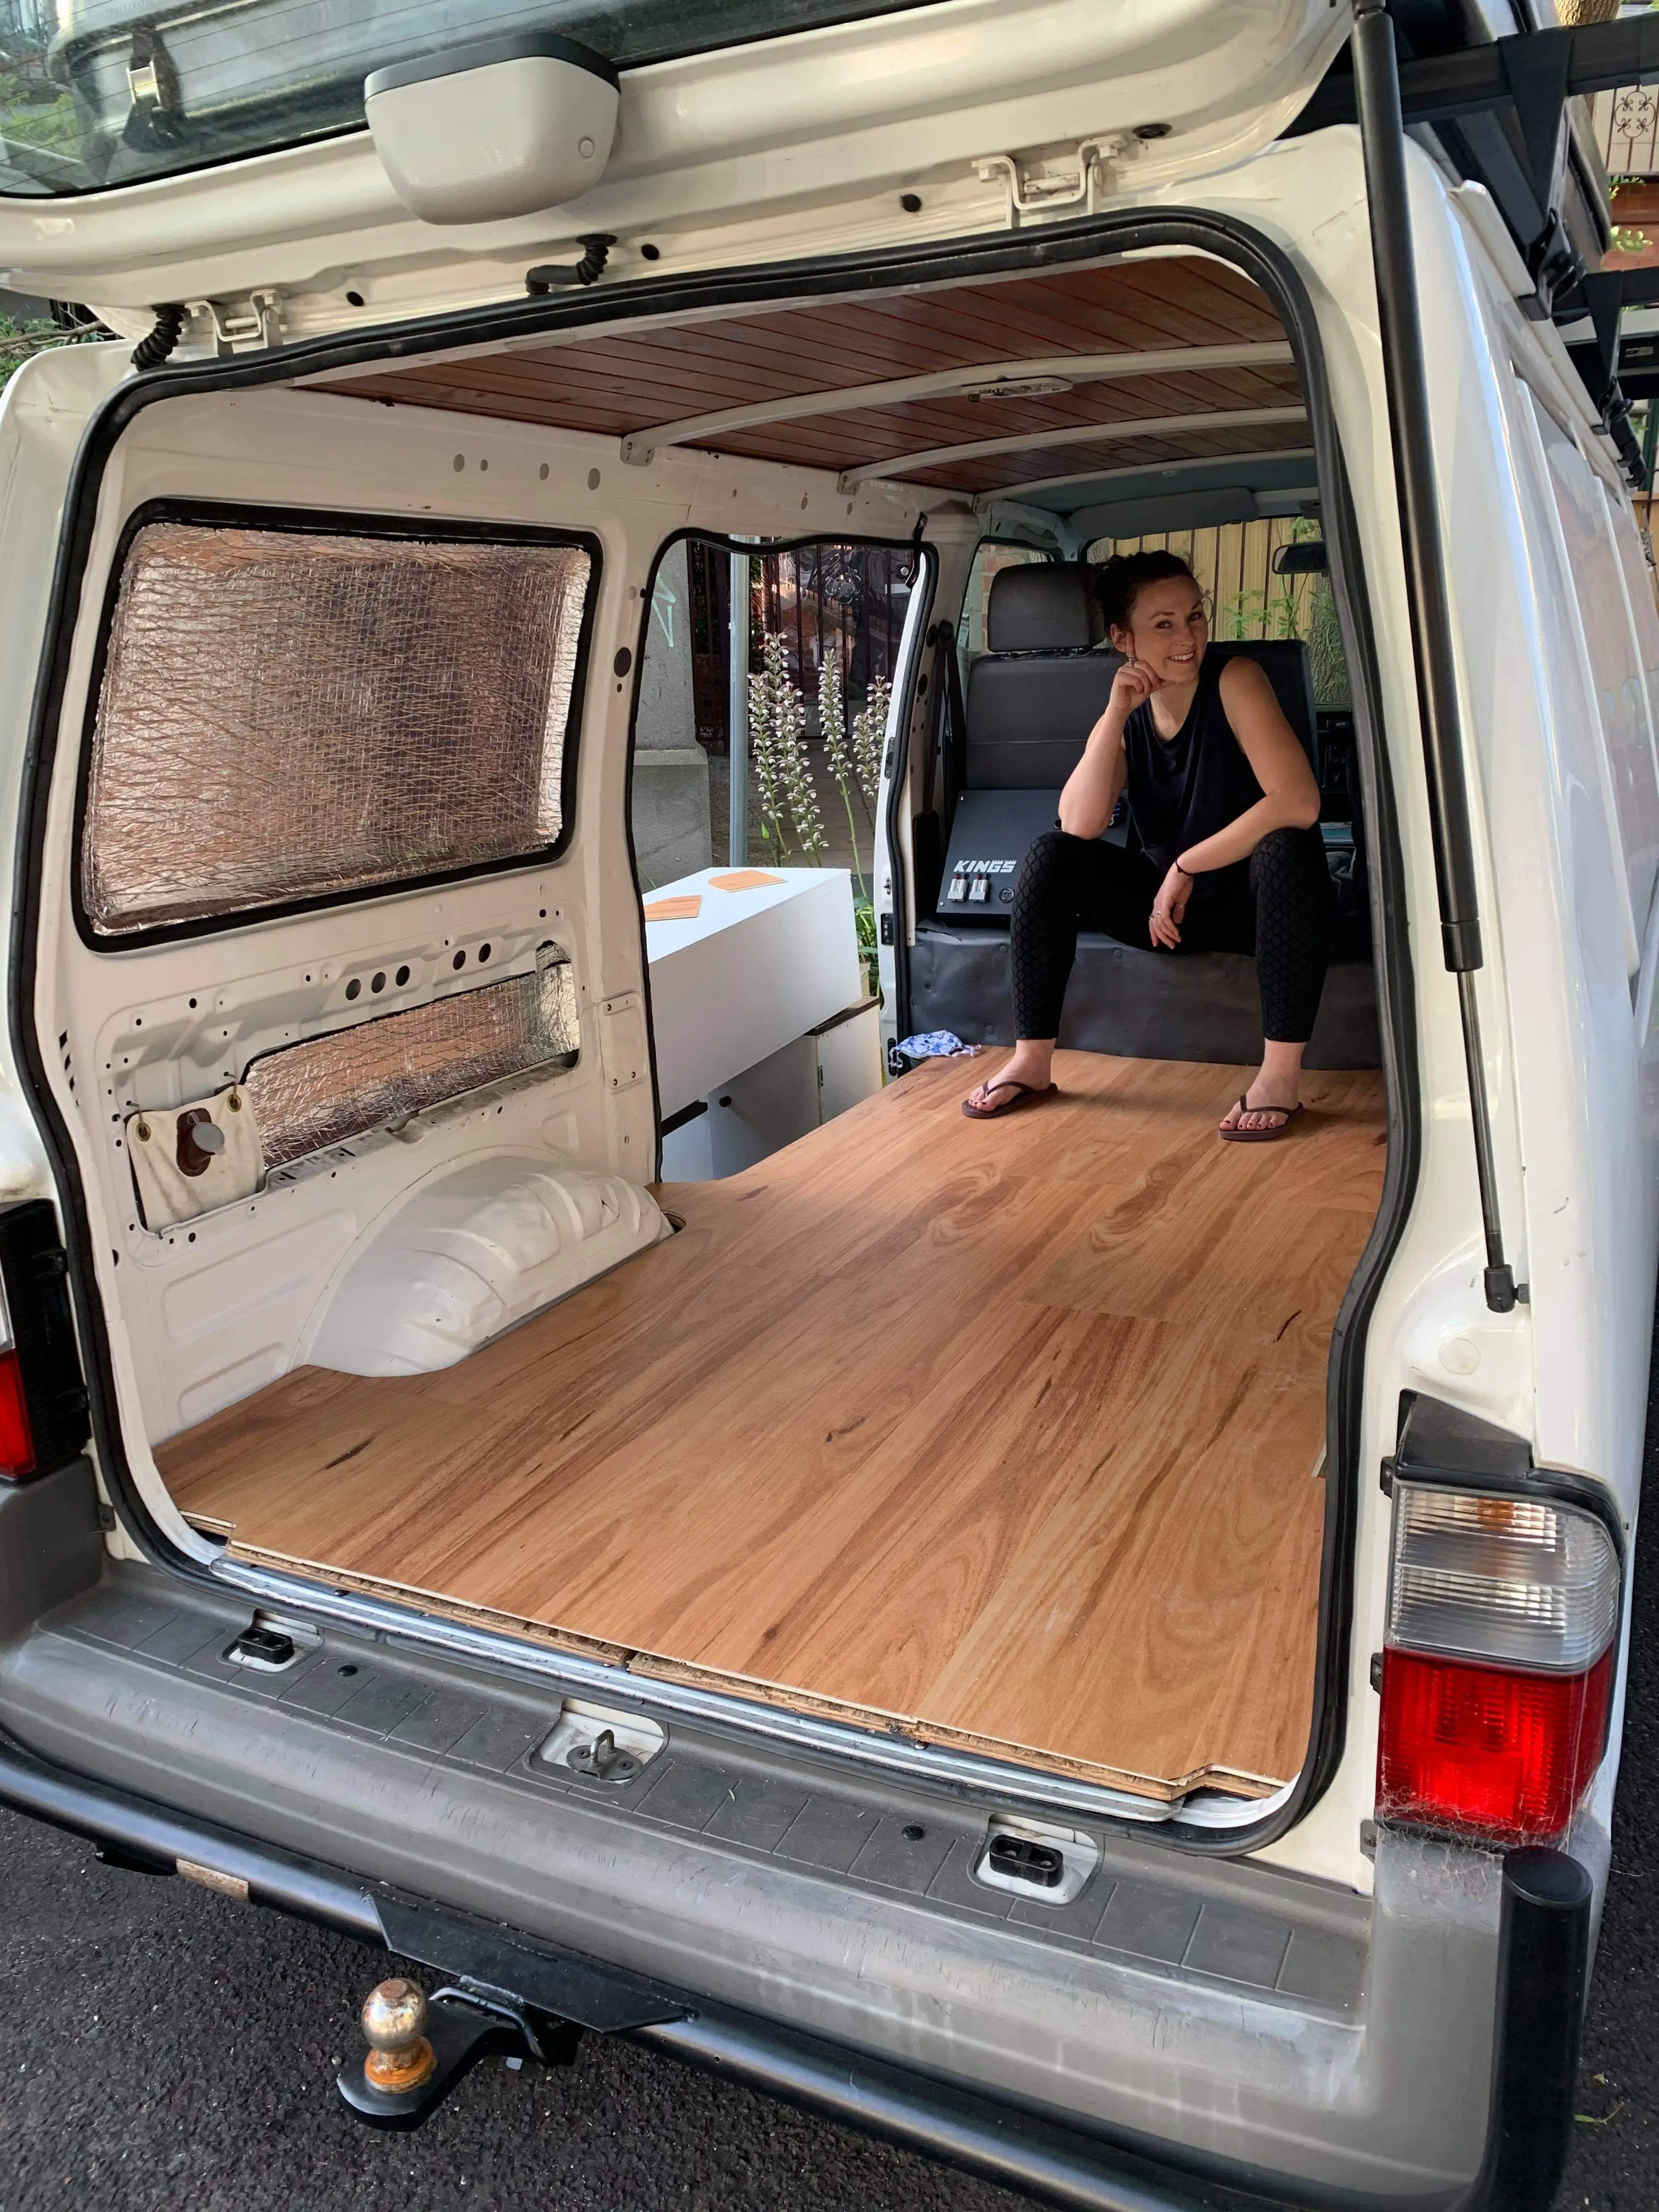
When I bought the van, it came with a crappy wooden floor protection that we were planning on sanding and varnishing and repurposing as our floor. Again, it was a cheap solution as we planned to have a rug down to cover most of it anyway. However I’m glad that never eventuated as a rug would have been impractical for us with our dirty hiking boots and seating bench/daybed layout.
Instead, we were extremely fortunate that my partner’s dad had just moved into a new home and had some leftover high quality tongue and groove floorboards which he gave us. We fitted the floor in a matter of minutes and it absolutely lifted the whole interior to another level.
I absolutely love the wooden floor in our van but it has got a little scratched near the side door. We now use foam mat protection (that we use on the ground for our outdoor shower) whenever we want to put anything in the back of the van.
Van Walls (Cheap & Cheerful Option)
For the van walls, I went with an option that I thought was only going to be temporary but has actually worked well.
With the van having a slight curvature to the sides, I wanted something that could mirror the shape, again to make the van feel as big as possible inside. Aesthetically I wanted wooden panelling but it was going to cost thousands of dollars. It also would have been a nightmare to install due to the curved shell of the vehicle.
Instead we got some large sheets of expanded PVC and used a Stanley knife to cut them to shape. They were so quick to make. We then drilled the sheets in six places to secure them into the metal wall – the corners and the middle at the top and bottom.
Considering there isn’t all that much empty wall space anyway, expanded PVC walls were a great, cheap, easy and practical option. They can be wiped down if they get muddy and replaced easily using the old one as a template if they get battered or damaged.
Couples Sleeping & Awning
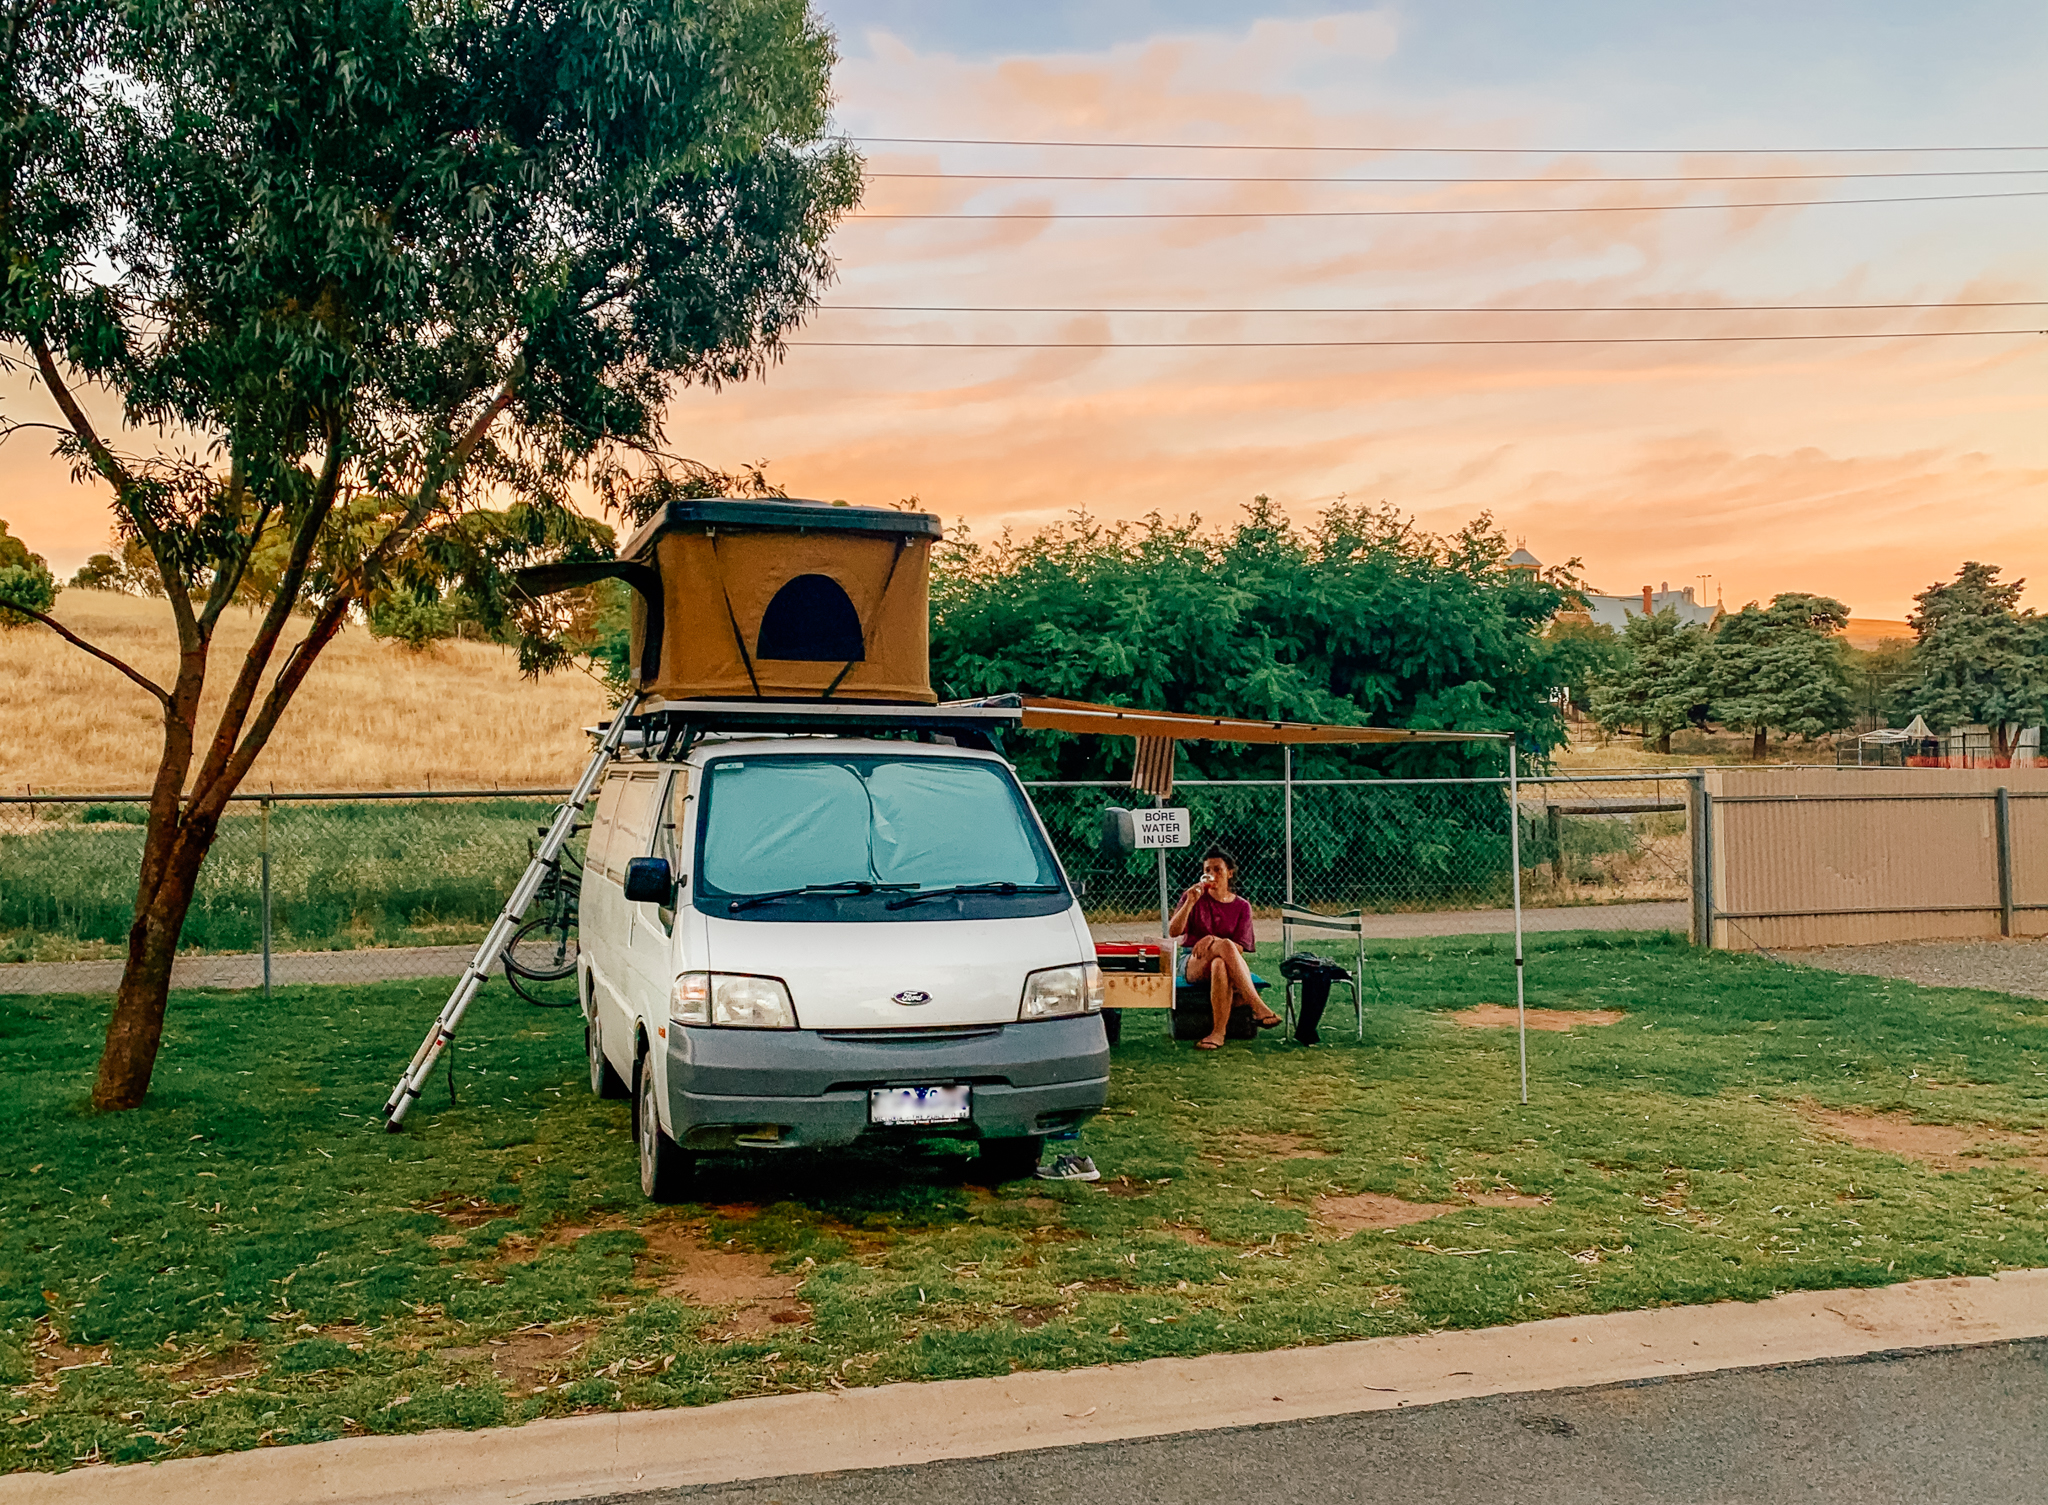
Sleeping two people inside the Econovan, without taking up the whole space for a bed, was going to be a challenge so we came up with an alternative instead. Sleeping on the roof!
We found a hardly used Kings hardtop roof top tent listed on Facebook Marketplace. We snapped it up for $940 (RRP $1400), deciding it was the perfect solution to comfortably sleep two people, whilst saving the inside of the van for living space.
By the way – if you’re looking to fit out a small van on a budget, I would highly recommend keeping an eye on Facebook Marketplace. People are always selling things brand new that they didn’t end up using on their own vehicles. It can help you to save a lot of cash.
We mounted the Kings rooftop tent onto Tradesman Pair Bar 1500 roof racks costing $300 from Repco, ensuring they met the weight rating of the rooftop tent and also a Kings awning. The Kings awning was purchased new for $173 and is 5x5m, mounted over the sliding side door. When you live in Australia, you have to make the most of that outdoor living space!
We ensured we left enough space at the front of the van to mount another set of roof racks for a solar panel. Later we strapped a jerry can of fuel in the gap between the rooftop tent and the solar panel.
To open the tent, you simply undo the clips and push one side up first. Gas struts do their magic and lift it right up. You then do the same to the other side and voila! A bed in 10 seconds (with your bedding already inside!). A fold up ladder hooks onto the side of the plastic case of the tent, allowing you to climb up.
Solo Sleeping
For stealth sleeping or for when I am travelling solo in my van which I do a lot, it made sense to have the ability to sleep inside too. Therefore we came up with the idea of a small fold out bed, which by day is the sofa and storage unit. Van life is all about space saving techniques!
We attached another plank of wood to the top of the seating bench joined by a hinge on the outer side so when you take the cushions off, the top bit of wood folds out. Two timber legs underneath also fold out and lock into place with a little bolt to provide structural support.
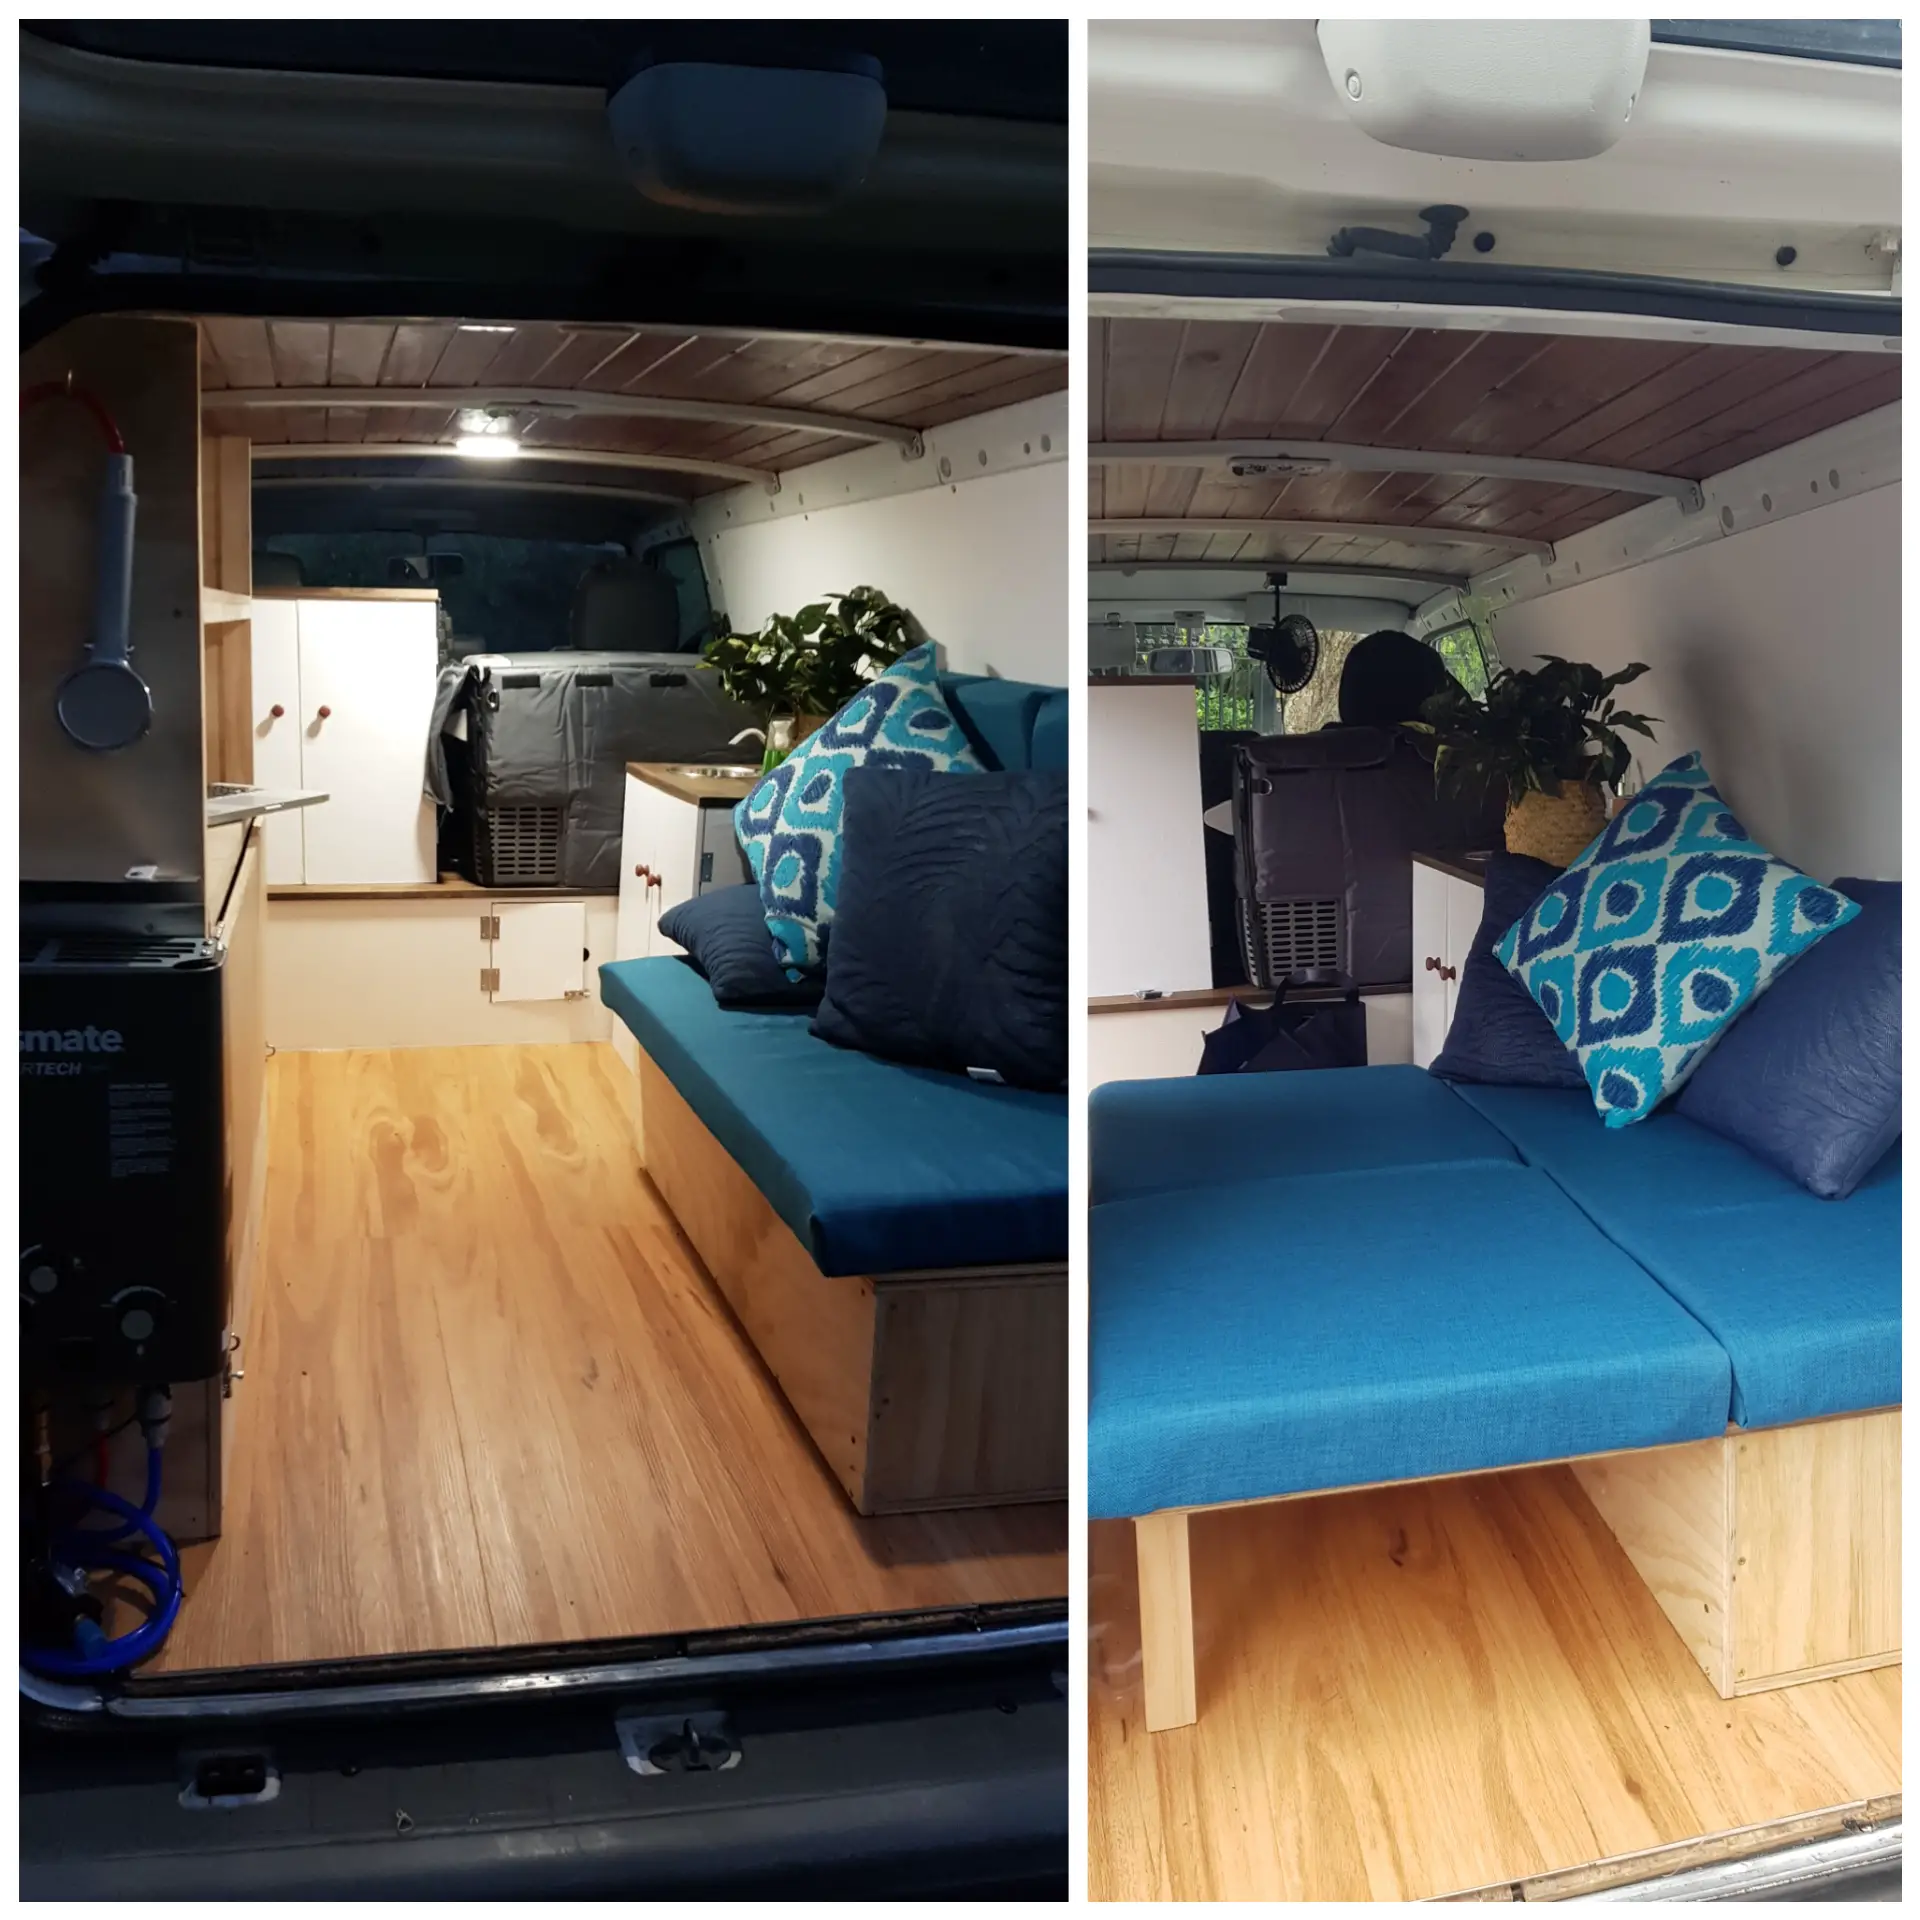
To add in extra surface area to sleep, we have two plastic tubs which contain firewood and other bits and bobs. We made foam cushions matching the same height and material as the cushions/mattress of the daybed, to lay on top of the boxes. We put the boxes lengthwise together next to the daybed and in front of the sink, creating more mattress space to stretch out our legs.
All the cushions were made using MDF cut to size, stacked with two types of foam to get the desired height and comfort, and then wrapped in turquoise material that was suitable for outdoor furniture use. I wanted something that was not too light in colour, practical and durable. The cushions stay in place with white Velcro on the back to stick in place against the wall and also the wooden bench. When you have a van, Velcro to stop things sliding around when you drive is your best friend!
We have actually both slept on the day bed together late at night when we had to wait for a petrol station to open. It was tight, but manageable for a night. For one person it’s great.
A day bed was such a good idea in hindsight and I don’t know what we’d do without it. There are so many occasions you want to lay down and not be sat upright, especially when it’s raining, when you want to watch a movie or to just chill and enjoy van life.
Kitchen, Dining And Living Cabinetry
The layout for the Ford Econovan works great and there is actually nothing major I would change about it. It’s practical and the best use of space. I absolutely love the slide out kitchen and day bed especially.
However, I would absolutely change the quality of the wood we used for building the cabinetry. It does look cheap and very homemade.
We got someone to pick up the wood for us from Bunnings and instead of buying Marine Ply or Construction Grade ply, they got Project Ply. It was quite grainy and wasn’t as sturdy as we planned. We painted the kitchen units white but it actually made the grain quality look a bit worse. In fact, some bits were so offensive we wrapped the cupboard doors in white sticky vinyl sheets!
As it was our first time building cabinets from scratch – well, let’s just say there are a few stray holes and not-so-perfect joins. But at least now we have units to use as a template for the future when we may rebuild them in better quality wood.
I did however buy some Acacia Solid Oiled Hardwood Project Panel benchtops from Bunnings for $99 each and cut them to size which made the kitchen units a bit smarter.
As for the shelving unit opposite the sofa/daybed, this was a bit of a freestyle project. Due to the curvature of the walls, it required a bit of modification to fit. It’s not perfectly flush against the wall but it is as good as it could get. I haven’t painted the shelf which I initially intended, but instead sealed it with a transparent wood sealant. Again, if the quality of the timber was better, it probably would look much nicer.
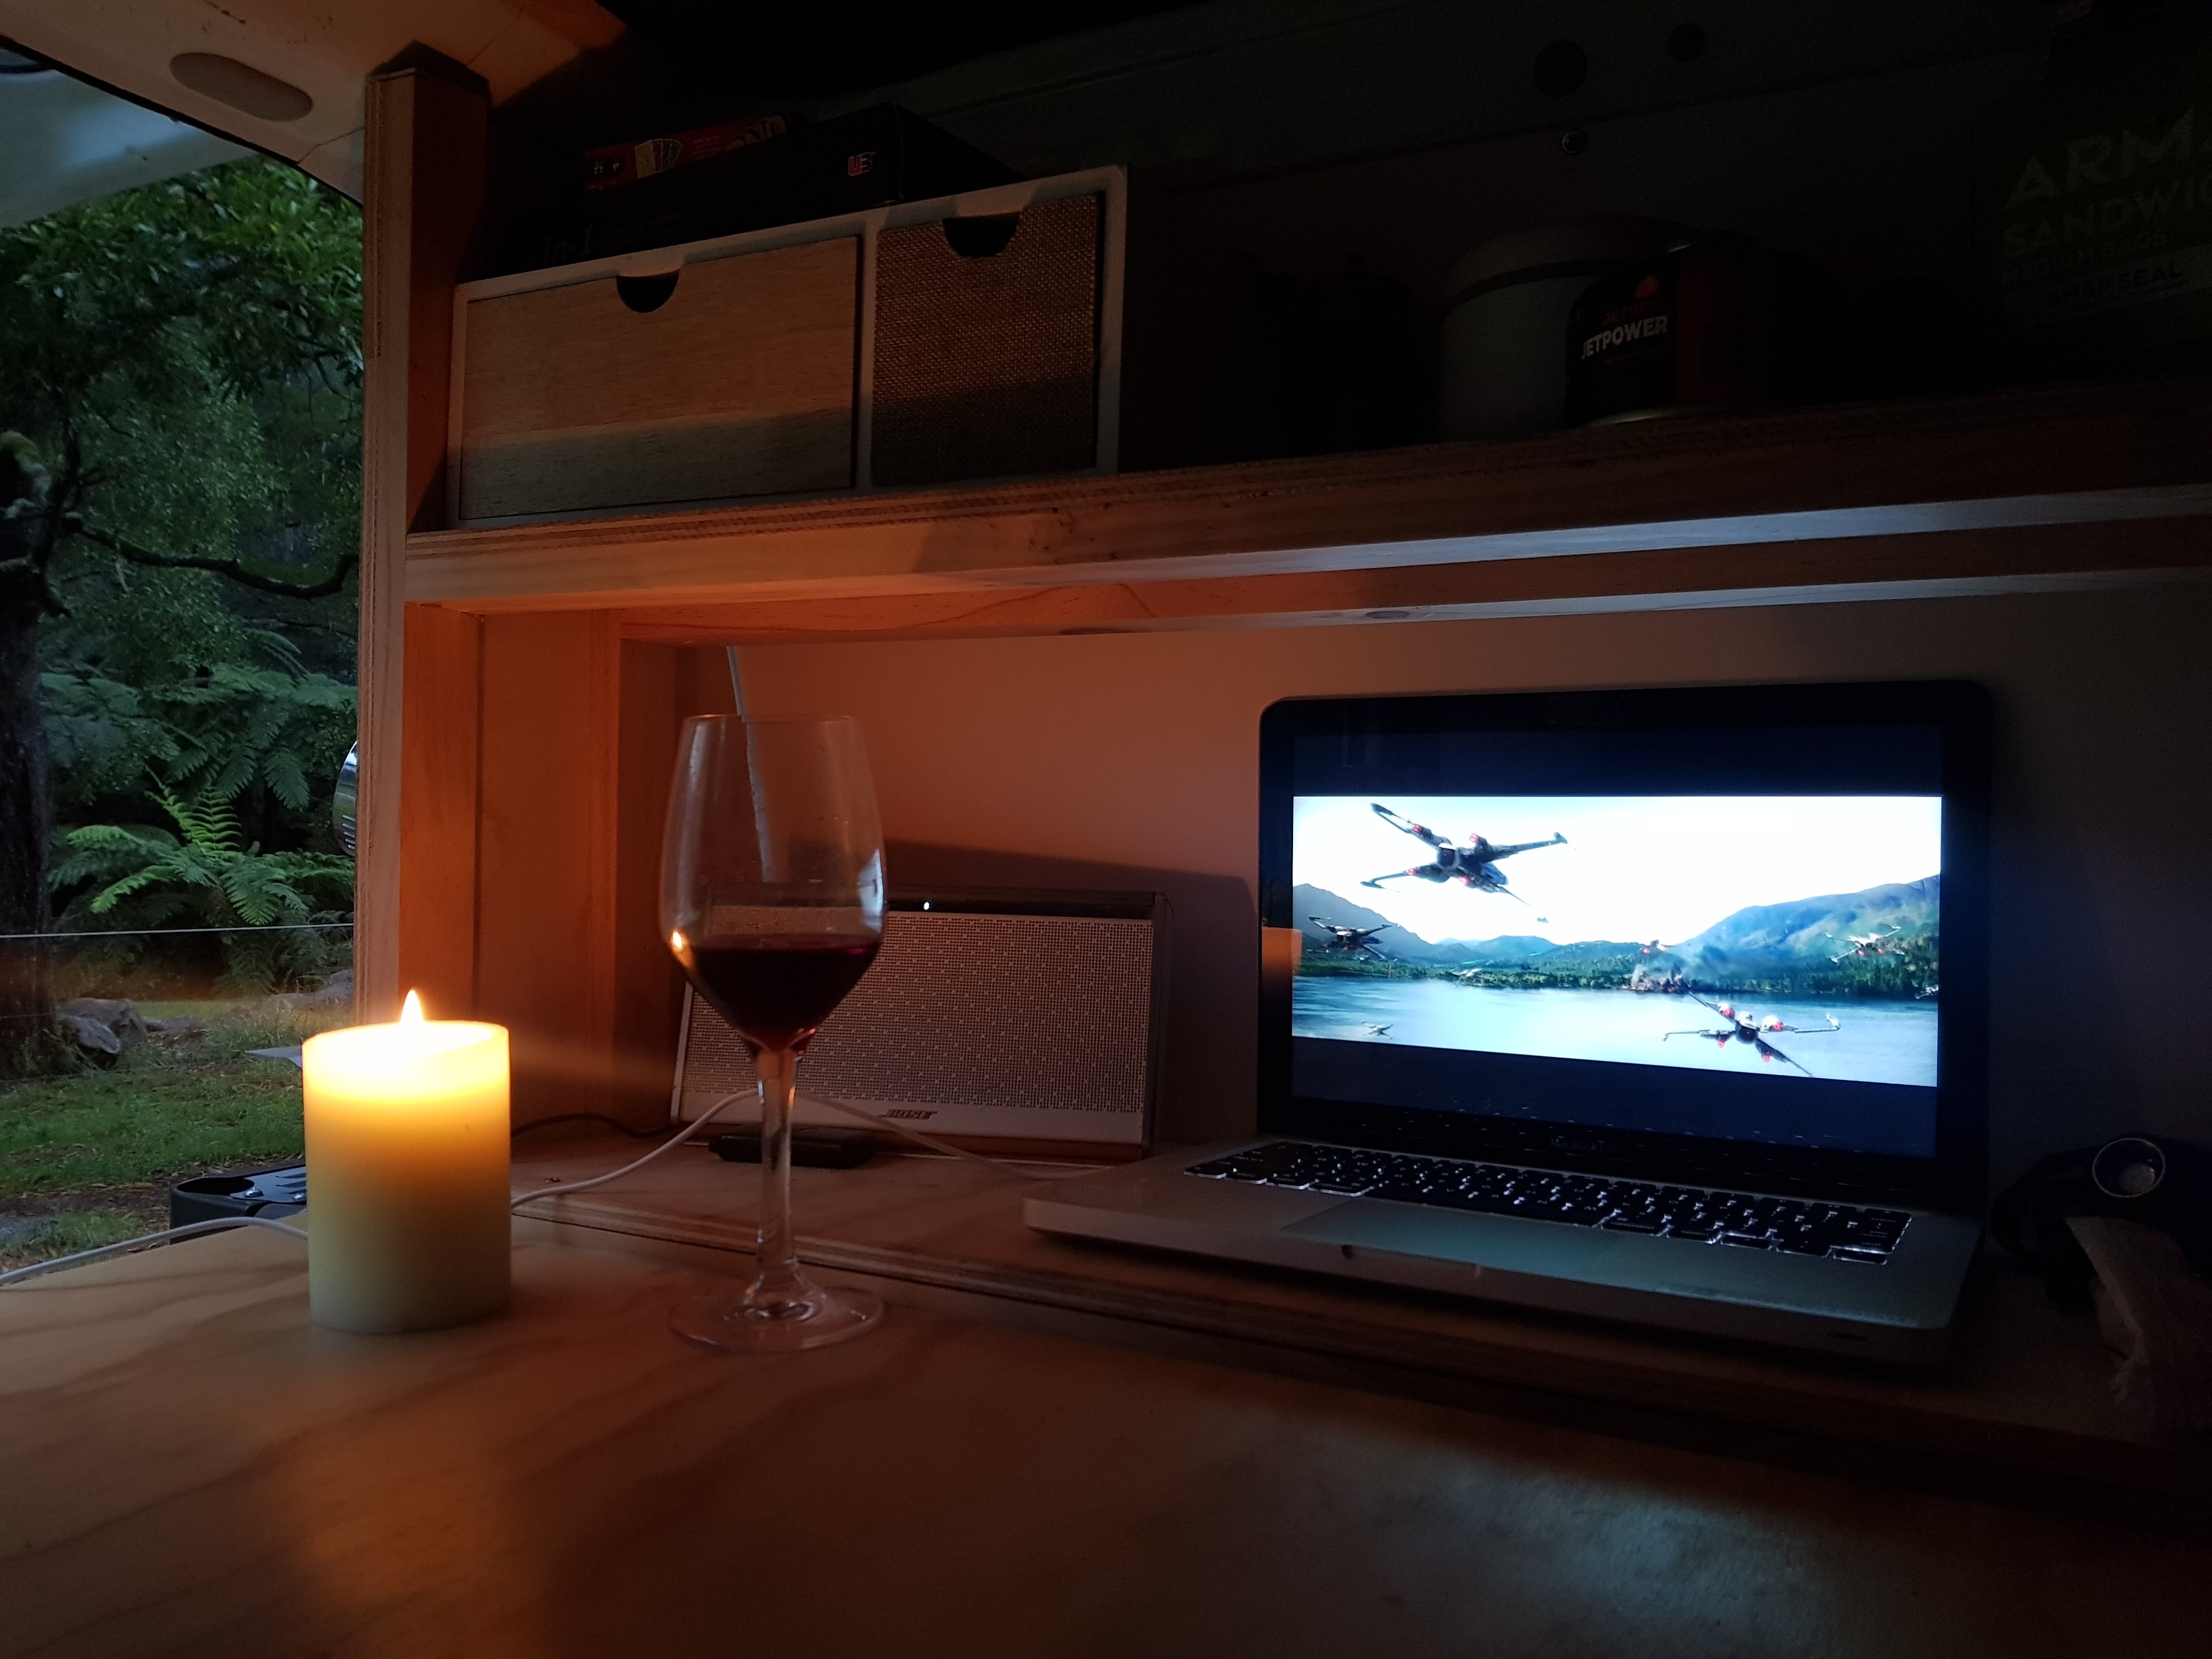
The shelving unit has the panel which lifts up for the table, but it’s also really useful as simply a surface to put things on once you’re set up at your camp. For example, a glass of wine!
All the units have been drilled into the floorboards to ensure they are firmly in place.
All in all I learnt that the quality of the cabinetry is quite an important part of the look and feel of the van. If I could do it again, I’d spend more money on good quality timber.
Bathroom And Shower
A little later down the track I realised I wanted to be much more self-sufficient in the van. When you are self contained, there are so many more campsites you are allowed to stay at, plus you can have so much more freedom to go off the beaten track for longer and not worry about being close to amenities.
We purchased a portable Dometic 972 chemical toilet for $135 which we just carry with us but wouldn’t use unless in an emergency. That way, we can say we have a toilet if questioned at a self-contained only campsite.
Ahead of our 10 day road trip through South Australia in summer, we bought a Gas Mate shower for $300. As it was so dusty in SA, I was so grateful we did!
Initially we were planning on simply hanging the shower unit from the boot door whenever we needed it. Instead we carefully deconstructed the shower unit and screwed it onto the side of the shelf to the back of the vehicle. You are not meant to permanently fix the Gas Mate shower anywhere as they easily overheat and can set alight, but we made a heat deflector which has worked really well and only use it when someone else is operating and monitoring the unit.
There’s a 15L plastic tub in the shelving unit which we fill with water from our jerry cans and submerge the pump in. We’ve found that 15L is just about enough water for two people to have a very quick functional shower. We also bought a pop-up tent to shower in for privacy (and for the toilet if we ever need it) and use foam matting for underfoot.
If we’re just after a quick rinse off in our bathers after being in the sea, we fitted a bracket on the boot door which we can attach the shower head to and shower underneath.
As great as the Gas Mate shower is, we have encountered a few problems with it. It’s definitely a little temperamental and requires precision to get the temperature and pressure just right. Sometimes it also won’t light. It’s worth having but we can’t always rely on getting it to work 100% of the time.
And that’s about it! I hope this tour of my Ford Econovan camper van conversion has given you some ideas if you’re planning your own small van fit out on a budget. I’d love to hear if you have found this breakdown of how we converted an empty shell to an adventure van useful.
This is absolutely amazing! It seemed like a lot of work but such a good job was done. I love having the shade with you wherever you park, the sun can get a bit too hot for me.
It was quite hard work! I don’t know how people fit out bigger ones, suuuch a big project as it is! Yes the awning is fantastic in all sorts of weather!
It amazes me just how much can fit into a small space!! Well done – you guys have done such a great job!!
I know! Honestly it’s like a Mary Poppins bag when you look at all the storage space and features. Haha, thank you, it does the trick! Now fingers crossed we get to use it more this year!
This looks like a project hubby would really enjoy. My girls were talking about wanting to tour around New Zealand in a campervan. Your build out might just interest them.
New Zealand would be a fantastic place for a long-term road trip and doing up your own van would be a super cool way to do it!
Aww looks sooo amazing! When we bought our self-contained car + rooftent last year in New Zealand, it was already ready to hit the road but our next plan (in NZ or somewhere else) is to convert our own camper van so this article is definitely useful for me!!! Thank you!
Oh yay that’s so good to hear! I did 2 months in a van in NZ and it is up there with some of the best travel experiences I’ve ever had! If you have the means, building your own van is so fulfilling because you can obviously totally customise it. Good luck for when you do it!
Nice job T.. you have worked some magic to get so much into such a small space and at that price. A true adventure van. Very impressive!
Oh thanks mate <3
I was so engrossed reading this, it’s just brilliant. I’m super impressed at the use of space, especially the way you have the stove come out, and the bed/seating area. I often see some of the bigger vans like you said, but this is great for a smaller version. Love it!
Aw thanks for your lovely comment. Yes it was hard to find small van inspiration and ideas without spending a bomb too. Pretty happy with how she turned out. She’s a bit of a Mary Poppins van to be honest, there’s way more storage space than you think!
Wow this looks so fun – I’d love to do a van conversion one day!
It’s hard work but super fun 🙂
Wow you’ve done such a great job! I would love to have a van one day!
Thanks Alice!
Loved reading this! I’ve always want to build a van from scratch but I have no idea how to go about it. It looks like a fun experience to build it!
Honestly we just winged it! But learnt a load for the next time or for improving it in the future.. It was really good fun!
Wow, you’ve done a magnificent job. Let the adventures begin!
Yewww ✌
This is such a great guide, thanks for so much detail. I’ll be passing this onto my friend that plans to do the same
I probably wrote too much haha but thank you 🙂
What a great build! I love finding builds that are accessible with a more moderate budget!
Yes, it’s certainly not a cheap thing to do but it can be done with a moderate budget if you make a few compromises. It’s been amazing. Thanks for your comment.
Great article! Couldn’t stop reading 😀 I have a van myself and your tips are very useful! 🙂
Aw thanks Annelies! I’m glad! Having a van is actually kind of live changing, don’t you think?
What a great way to build that van! Great job on that. I have always wanted to do a project like that and have to say you inspired me.
This is my boyfriend’s dream to fix a van and go around the country in it! After reading this, I think I might take it into consideration since it sounds cute!
YEAH really very insparational. I have been living in my Ford Econovan without the fitout for 6 months now. Call it the Ford Motel. Cheaper than motels and go anywhere i want. Hats off to you though.